API Testing Using Playwright With Python
We’re Earthly. We simplify and speed up software building with containerization. If you’re testing APIs with Python, Earthly can streamline and automate your build process. Check it out.
Playwright is a popular end-to-end testing framework that Microsoft backs. With support for popular programming languages, such as Javascript, Typescript, Python, and Java, you can use Playwright to test your existing software projects. In addition to end-to-end testing, Playwright also supports API testing using built-in methods in the APIRequestContext class. This allows you to use a single tool to implement both end-to-end testing and API testing. Moreover, Playwright provides customized reports with different types, such as CI report or allure report.
In this article, you’ll learn how you can implement API testing using Playwright with Python, then generate an allure report for API testing.
What Is API Testing?

API testing ensures that your services’ APIs work as expected. With the rise of microservices architecture, API is now a crucial part of software applications: from web applications to mobile and embedded applications.
In API testing, you verify whether the response of the API matches the expected response, given an input. You check the API status code and the API response body when verifying the API response. In addition to testing every API separately, you can combine multiple APIs into a test that fulfills a user scenario to simulate how users interact with your app through APIs. By checking users’ flows through a combination of APIs, you can ensure that the users’ journey works as expected without doing the end-to-end test on the user interface (UI), which is often known to be flaky and hard to maintain due to the ever-changing UI elements.
Playwright supports API testing in Python in both synchronous and asynchronous ways. With the synchronous way, the implementation is more straightforward. You don’t need to ensure that the previous code has finished execution before accessing its result. In addition, you’re less likely to run into race condition issues when multiple processes access the same resource simultaneously. However, the test execution is slower than in an asynchronous manner. In this article, you’ll implement an API test with an asynchronous approach.
Prerequisites
To follow along with this article, please prepare the following prerequisites:
- A Linux-based machine (preferably an Ubuntu machine version 20.04; this article uses Ubuntu 20.04)
- A ready-to-use Python environment version 3.7 or later
- A Python virtual environment. You can use virtualenv or the built-in venv.
- A GitHub account to interact with the GitHub APIs
- Java version 11 for using the
allurecommand line - Allure CLI tool to generate allure test report
API Testing with Playwright and Python
To simplify the demonstration, let’s write the tests for an existing set of APIs so that you don’t need to implement your service to test its API.
GitHub provides the APIs for creating, updating, retrieving, and deleting GitHub repositories. Let’s write the tests for GitHub APIs. You will implement the complete flow test scenarios to create a new repository, update it, and remove it.
Step 1: Grab the GitHub API Token
From GitHub Settings Page, and click on Developer Settings option on the sidebar. You should see a similar screen to the one below:

From this page, click on Personal access tokens, and choose Tokens (classic).
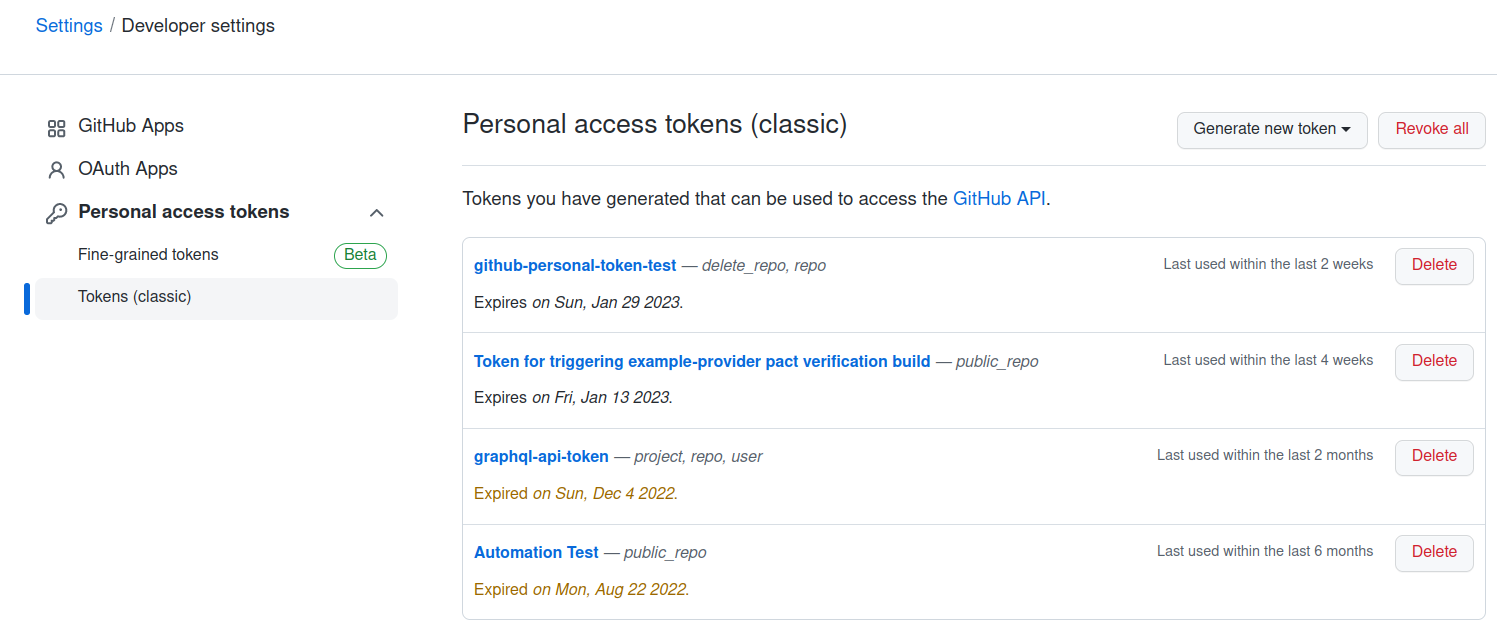
Click on Generate new token > Generate new token (classic) to generate a new GitHub token.
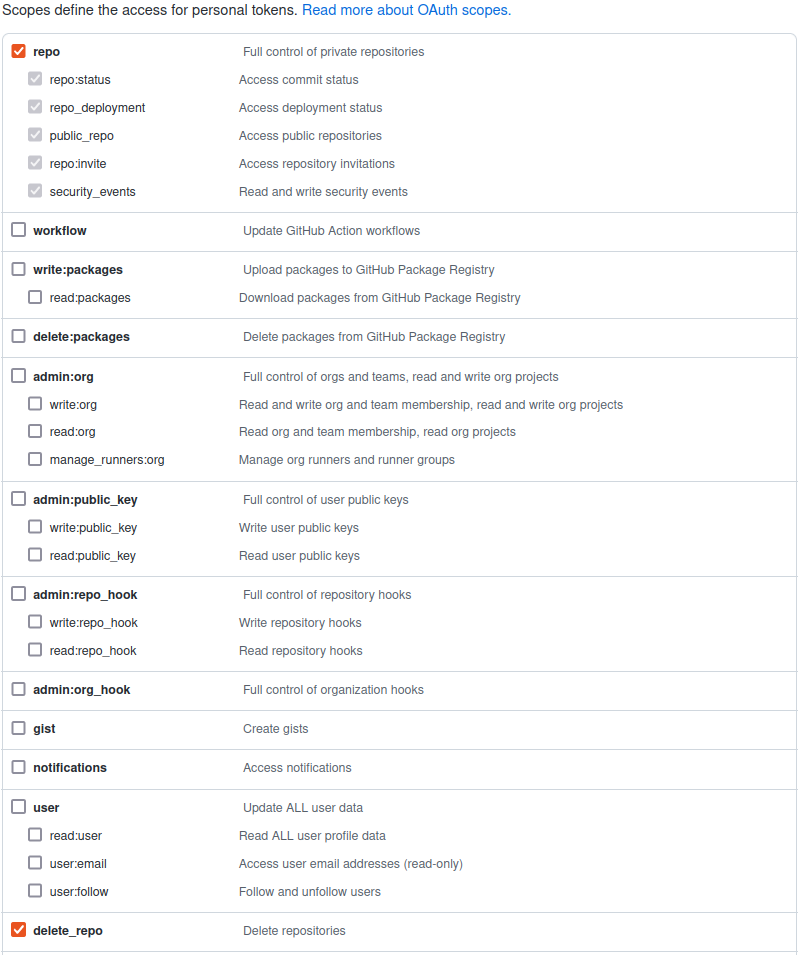
Check the repo and delete_repo boxes so you can create, update, and delete a repository.
Then fill in the name for your token, hit Generate token at the bottom of the page, then save the token value somewhere safe.

You will use this token when executing the API tests later on.
Step 2: Create a New Python Project
From the Home directory of your machine, run the following command to create a new directory named api-testing-python-playwright inside the Projects directory:
mkdir -p Projects/api-testing-python-playwrightChange to the api-testing-python-playwright directory by running:
cd Projects/api-testing-python-playwrightCreate a new virtualenv environment and activate it:
virtualenv venv
source venv/bin/activate
Using the virtualenv tool is a great way to create a Python virtual environment. Using a virtual environment, you can isolate the dependencies amongst different projects in the same machine, allowing you to create different versions of dependencies, and mitigating the risks of having dependency conflicts.
Step 3: Install the Dependencies
After creating a new Python project and activating the Python virtual environment, you need to install the needed dependencies to implement API tests.
From the terminal, run:
pip install pytest-playwrightBy installing pytest-playwright dependency, you can get the playwright framework to interact with the GitHub API. In addition, pytest-playwright also comes with the pytest library, a popular Python test runner, which helps you to structure the tests flexibly.
Step 4: Create Functions to Make API Calls
Create a new Python file to store Python functions for making API calls:
touch github_api.pyOpen up the github_api.py:
nano github_api.pyThen copy the following content to the file:
from playwright.async_api import APIRequestContext


async def create_new_repository(api_request_context: APIRequestContext, \
                                repo_name: str, is_private: bool,
                                api_token: str):
    return await api_request_context.post(
        "/user/repos",
        headers={
            "Accept": "application/vnd.github.v3+json",
            "Authorization": f"token {api_token}",
        },
        data={"name": repo_name, "private": is_private},
    )
Since pytest-playwright offers two approaches for implementing tests: asynchronous and synchronous, you need to import the Python class APIRequestContext which supports asynchronous programming.
You also defined the asynchronous Python function for creating a new repository on GitHub using GitHub API. The asynchronous Python function starts with async def syntax. Inside the asynchronous Python function, when making API calls, you need to add the await keyword before the calling functions so that when you work with the responses of the functions, your return values are ready to use.
To create a new repository using the GitHub API, you need to use the post method: api_request_context.post(). You also need to provide your GitHub token to authorize your API request: "Authorization": f"token {api_token}". In the request body of the API, you need to include the name for the new repository, and specify whether you want the repository to be private or public: data={"name": repo_name, "private": is_private}.
You have just defined a Python asynchronous function for creating a new repository. Copy the following code below the create_a_new_repository function inside github_api.py file to define the update_repository:
async def update_repository(api_request_context: APIRequestContext, \
                            repo_name: str, repo_update_name: str,
                            username: str, description: str, \
                            is_private: bool, api_token: str):
    return await api_request_context.patch(
        f"/repos/{username}/{repo_name}",
        headers={
            "Accept": "application/vnd.github.v3+json",
            "Authorization": f"token {api_token}",
        },
        data={"name": repo_update_name, "description": description, \
        "private": is_private},
    )
To update the repository, you need to set the API method to patch: api_request_context.patch() and provide your GitHub token "Authorization": f"token {api_token}". In the request body of the update repository API, you need to specify the repository name, the updated description and the repository status whether you want it to be private or public: data={"name": repo_update_name, "description": description, "private": is_private}.
Add the following code to define the remove_repository function:
async def remove_repository(api_request_context: APIRequestContext, \
                            repo_name: str, username: str, api_token: str):
    return await api_request_context.delete(
        f"/repos/{username}/{repo_name}",
        headers={
            "Accept": "application/vnd.github.v3+json",
            "Authorization": f"token {api_token}",
        },
    )
To remove a GitHub repository, you need to set the API method to delete and provide the repository name in the API path. You also need to provide your GitHub token to authenticate the API request.
In your github_api.py file now, you have defined the three functions to create, update, and delete a GitHub repository. For details on how to interact with GitHub API, check out this GitHub documentation.
Step 5: Create Test Functions to Implement Test Scenarios
The next step is creating a test file that defines the test functions for your test scenarios. To do it, from your terminal run:
touch test_github_api.pyOpen test_github_api.py:
nano test_github_api.pyTo interact with the GitHub API, you need to add a GitHub username and GitHub API key to the API requests. The values of GitHub API_TOKEN and USER_NAME are retrieved from environment variables.
In the test file test_github_api.py, you import os library to read the environment value for GitHub USER_NAME and API_TOKEN. You also import APIRequestContext, async_playwright and pytest to define the asynchronous test function and pytest fixture. To use the pre-defined functions for creating, updating and removing a GitHub repository, you import create_new_repository, update_repository, remove_repository from the github_api.py file.
import os
from playwright.async_api import APIRequestContext, async_playwright
import pytest
from github_api import create_new_repository, update_repository, \
remove_repository

API_TOKEN = os.getenv('API_TOKEN')
USER_NAME = os.getenv('USER_NAME')
The pytest library has a robust functionality called fixture. Using pytest fixture, you can flexibly design the test scenarios in the exact way you want.
The following code defines a pytest fixture. First, you need to add the @pytest.fixture() decorator to tell pytest to treat this function as a fixture. Then you create an asynchronous function named async def api_request_context(). With this fixture, pytest will create a new request context before every test and terminate the request context after the test is done.
In the defined request context, you also add base_url="https://api.github.com" to tell Playwright to use the URL https://api.github.com for the tests so that you don’t need to include the whole API path inside the tests.
@pytest.fixture()
async def api_request_context():
    async with async_playwright() as p:
        request_context = await p.request.new_context(base_url=\
        "https://api.github.com")
        yield request_context
        await request_context.dispose()
Next, you need to define the test function in your test file. To do it, copy the following content and put it below the current code:
async def test_full_flow_scenario(api_request_context: APIRequestContext):
    # Create a new repository

    response_create_a_repo = await create_new_repository( \
                                api_request_context=api_request_context, \
                                repo_name="test-repo", is_private=True, \
                                api_token=API_TOKEN)
    assert response_create_a_repo.status == 201

    # Update name and description of the repository
    response_update_a_repo = await update_repository(\
                                api_request_context=api_request_context, \
                                repo_name="test-repo", \
                                repo_update_name="test-repo-update", \
                                username=USER_NAME, \
                                description="This is a description", \
                                is_private=False, \
                                api_token=API_TOKEN)
    response_body_update_a_repo = await response_update_a_repo.json()
    assert response_update_a_repo.status == 200
    assert response_body_update_a_repo["name"] == "test-repo-update"
    assert response_body_update_a_repo["description"] \
    == "This is a description"

    # Remove the repository
    response_delete_a_repo = await remove_repository(\
                                api_request_context=api_request_context, \
                                repo_name="test-repo-update", \
                                username=USER_NAME, \
                                api_token=API_TOKEN)
    assert response_delete_a_repo.status == 204
In the test function, you first create a new repository, update the description of the repository, then remove it. To authorize the API requests, you must provide your API_TOKENin the API requests.
While creating, updating, and removing the repository, you check whether the API responses from the API satisfy the expected result using assert statement. For example:
assert response_body_update_a_repo["name"] == "test-repo-update"The expected status codes for creating a new repository, updating the repository, and deleting the repository are 201, 200, and 204. For example, to check the status code of the removing repository API, you write the code as below:
assert response_delete_a_repo.status == 204To tell pytest to run the tests asynchronously, you also need to create a pytest configuration file called pytest.ini.
touch pytest.iniThen add the following content to it:
[pytest]
asyncio_mode=auto
By configuring asyncio_mode=auto in the pytest.ini file, pytest will execute the test in an asynchronous manner. Now that you’ve finished adding the tests functions and tests configuration, let’s move to the next step to run the tests.
Step 6: Run the Tests
Since your test file now requires the environment variables for GitHub API_TOKEN and USER_NAME, you need to add the environment variables first.
Grab the API_TOKEN you create at step one and your GitHub username to include in the following commands.
export API_TOKEN=${your_api_token}
export USER_NAME=${your_user_name}
To execute the test, run:
pytestYou should see similar output, indicating the test has now passed.
plugins: playwright-0.3.0, asyncio-0.20.3, base-url-2.0.0
asyncio: mode=auto
collected 1 item
test_github_api.py .                                        [100%]

======================== 1 passed in 4.05s ========================
Step 7: Generate an Allure Test Report
Now you have successfully executed the GitHub API test using Playwright. However, the default test report is difficult to read, and you may also need to send your test report to other team members to collect their feedback. To improve the readability of your test report, you need to use a test reporter like allure.
First, you need to install allure-pytest.
pip install allure-pytestExecute the test again using allure required parameters.
pytest --alluredir=allure_result_folder test_github_api.pyStep 8: View The Allure Test Report
To view the allure report, run:
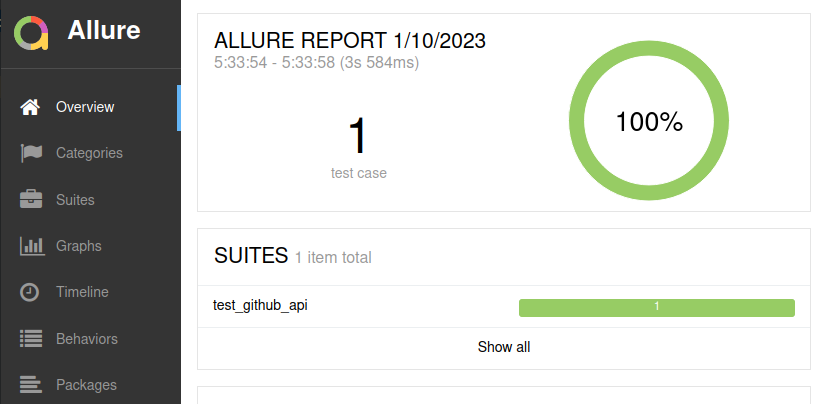
allure serve allure_result_folderYou should see the automatically generated report like below:
Step 9: Add a Failed Test
When implementing the test, there are times when your tests may fail. Let’s take an example to demonstrate this scenario and see how we can fix a failing test.
You will add another test function test_create_a_new_repository inside the test file named test_github_api.py. Inside the test function, you will make a request to the GitHub API to create a new repository in GitHub, and check whether the returned status of the API is 201 or not. The status code number 201 indicates that a new repository is created successfully. You can refer to Mozilla HTTP response status code reference page for a detailed explanation.
async def test_create_a_new_repository(api_request_context: \
                                        APIRequestContext):
    response_create_a_repo = create_new_repository(\
                            api_request_context=api_request_context,\
                            repo_name="test-repo",\
                            is_private=True,\
                            api_token=API_TOKEN)
    assert response_create_a_repo.status == 201
Step 10: Use allure To Capture The Failed Message, Then Fix It
Let’s run the whole test file with the option to generate an allure report to see the result.
pytest --alluredir=allure_result_folder test_github_api.pyThen open the allure report.
allure serve allure_result_folder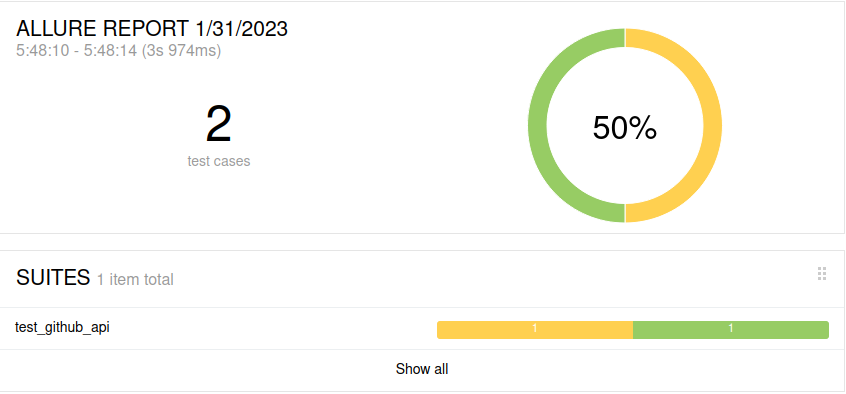
From the allure report, we can see one broken test. Clicking on the “Suites” menu on the left panel, we see the test that has failed is test_create_a_new_repository.

Clicking on that failed test in allure report, we see the error message is "AttributeError: 'coroutine' object has no attribute 'status'" and the line of code that caused the error is captured.
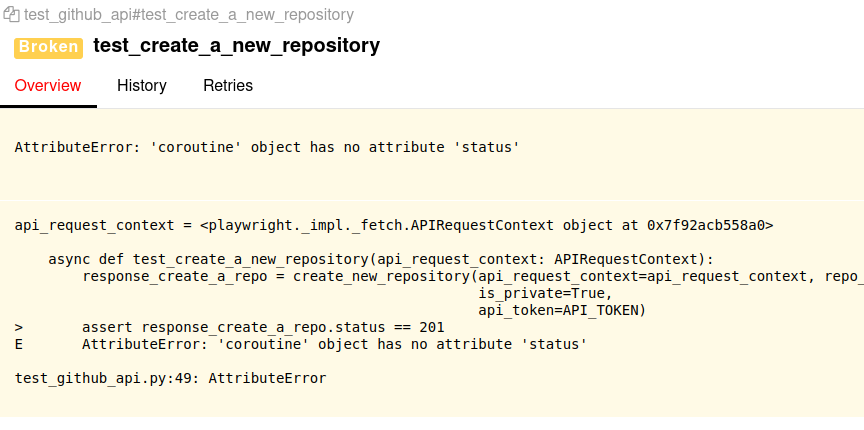
pytest complains that the coroutine object response_create_a_repo does not have a status attribute. Usually, the response of the API should always have a status attribute, regardless of the status of the API test.
Taking a closer look at the definition of response_create_a_repo variable, we can see that we’re missing the await keyword before the API request create_new_repository. Without the await keyword, pytest does not wait for the API request to finish, but moves on to the next line of code immediately, causing the variable response_create_a_repo not to have a status field.
To fix this, let’s add the missing await keyword before the create_new_repository function call. The code will now look like below:
async def test_create_a_new_repository(api_request_context:\
                                        APIRequestContext):
    response_create_a_repo = await create_new_repository(\
                                api_request_context=api_request_context,\
                                repo_name="test-repo", \
                                is_private=True, \
                                api_token=API_TOKEN)
    assert response_create_a_repo.status == 201
Run the test file again.
pytest --alluredir=allure_result_folder test_github_api.pyThen open the allure report.
allure serve allure_result_folder
As seen, the tests are all passing now.
Conclusion
In this tutorial, we’ve gone through how to use Playwright with Python for API testing, specifically on GitHub APIs. This powerful approach will enhance your app quality, ensuring new features don’t mess up the existing ones. Plus, thanks to generated allure reports, you’ll have full visibility of your API test results, including any failures.
If you’ve enjoyed learning about API testing with Playwright and Python, why not take your build process up a notch? Check out Earthly, a tool that can further streamline your development workflow.
Explore how Earthly can enhance your build process!
Earthly makes CI/CD super simple
Fast, repeatable CI/CD with an instantly familiar syntax – like Dockerfile and Makefile had a baby.


