Docker Image Optimization Strategies: How to Minimize Docker Images
We’re Earthly. We make building software simpler and faster with containerization. If you’re deploying container images, Earthly can be a game-changer for building them reliably and quickly. Give us a peek.
Docker images allow you to easily deploy your applications to different infrastructures such as Kubernetes clusters, Cloud platforms and CI/CD pipelines. The size of these docker images matters when deploying and managing your applications. A large image imposes restrictions that necessitate enlarging storage capacity, resulting in expenses. The size of your application’s Docker image impacts critical aspects such as performance, scalability, portability, and the potential for security vulnerabilities to arise.
Building and pushing large Docker images to a registry such as DockerHub and ECR requires a significant amount of time. Additionally, a large image also slows downloads whenever you need to pull the application image from the registry resulting in increased time to build and deploy your application.
Ensuring you have light Docker images speeds up the build and deployment of your Docker containers. There are approaches you can add while building the docker image to reduce its size without affecting performance. This article will teach you the best strategies and tips for slimming down Docker images and reducing their size. So, if you’re looking for an easier way to manage your Docker images, this guide is for you!
Prerequisite
To follow along with this guide, ensure:
- You have Docker and Docker Desktop installed and running on your computer.
- You have basic knowledge of working with Docker.
Best Strategies to Minimize Docker Images

Optimizing and reducing your Docker images to the smallest size significantly reduce the cost and time spent building and pushing images. In this section, we will discuss different strategies to slim down Docker images and reduce size.
Before then, You need to create a Docker image you will work.
Creating a Sample Docker Image
The Docker image you will create in this section is for a simple Node.js application. You will use this docker image in different sections of the article. You will reduce the image size by following the strategies discussed in the coming sections. You can find the application code on this GitHub repository.
Based on this Node.js application, the following will be an ideal Dockerfile to create an image:
FROM node:19
WORKDIR /app
COPY package*.json ./
RUN npm install
COPY . .
RUN npm run build
EXPOSE 4000
CMD npm start
Run the following command to build the application image:
docker build -t node_example .Check if the image was successfully created using the following command:
docker images node_exampleAn image for this application will be created with the following size:
REPOSITORY     TAG       IMAGE ID       CREATED          SIZE
node_example   latest    a10aa8869a21   39 seconds ago   1.16GB
This is a huge image to run such a small application. Let’s slim this Docker image.
Choosing Base Images
The base image is the starting point for creating a Docker image, and it typically includes the underlying operating system as well as any necessary software and packages. Common base images for Docker include Alpine Linux, Ubuntu, Debian, CentOS, and Fedora. When running a Node.js application in Docker, one common base image is the official Node.js image available on Docker Hub. However, Node.js provides other variant image distributions with different tags that result in slimmer Docker base images. These tags include:
Bullseye - Provides a Debian distribution to reduce the number of packages that images need to install and thereby reduce the overall size of the custom image. Alpine - Any Node.js Alpine tags are derived from Alpine Linux to provide smaller base image distributions of about ~5MB.
Slim - A slim tag only contains the essential packages needed to run the Node.js application, effectively reducing the size of the image by eliminating any unnecessary packages.
All these tags are available on the Node.js official image page on Docker Hub, and you can choose a tag based on the distribution you want to use to reduce the Docker image size.
Below is an example of using the alpine tag distribution:
FROM node:19-alpine
WORKDIR /app
COPY package*.json ./
RUN npm install
COPY . .
RUN npm run build
EXPOSE 4000
CMD npm start
Applying this to your Dockerfile will reduce the image size as follows:
REPOSITORY     TAG       IMAGE ID       CREATED          SIZE
node_example   latest    a10aa8869a21   39 seconds ago   338.7MB
Each base image you use provides its distributions. Ensure you always check your base image tags that provide small image builds.
Using .dockerignore
While creating the above images, the COPY . . command copy all the files and folders present in your project directory. In this simple example, the application has the following structure:

Looking closely, Docker doesn’t need to copy all these folders and files. For example, theRUN npm run build command in the DockerFile will create the application build folder, and the RUN npm install command will create the node_modules folder. Therefore, you don’t need to copy these files while building the Docker image. Each folder and file copied add to the size of the image. It is best to avoid unnecessary copy.
The .dockerignore file allows you to specify files and directories that should be excluded from the context used to build a Docker image. To use it, create a .dockerignore file in the same directory as your Dockerfile and add the files and the directories that are not needed for the image build process.
Add the following in your .dockerignore file:
node_modules
Dockerfile
build
Rebuild your images and check the size:
REPOSITORY     TAG       IMAGE ID       CREATED          SIZE
node_example   latest    c1b36fb72af3   12 seconds ago   264MB
As a result, add the unnecessary files in the .dockerignore file creates smaller Docker images. Up to this point, the initial image size of 1.16GB has been reduced to 264MB.
Docker Image Layers
Docker image layers are the building blocks of Docker image. A single image is built in layers based on the instruction in your Dockerfile. Each command in your Dockerfile creates a new layer incrementally. Let’s create a new Dockerfile to demonstrate how layers are created and how you can reduce them.
The Dockfile example we have created so far packages the application with all dependencies for production and development. The created Dockerfile builds an image suitable for the development level, and it’s not optimized for production. The following Dockerfile creates an image that can be used for production purposes:
FROM node:19-alpine
WORKDIR /app
COPY package*.json ./
COPY . .
RUN yarn install
RUN npm run build
RUN rm -rf node_modules
RUN npm install --production
EXPOSE 4000
CMD npm start
This will create an image of the following size ready for production:
REPOSITORY     TAG       IMAGE ID       CREATED         SIZE
node_example   latest    fbebed577ab2   2 minutes ago  266.34MB
These new commands add more layers to the Docker image.
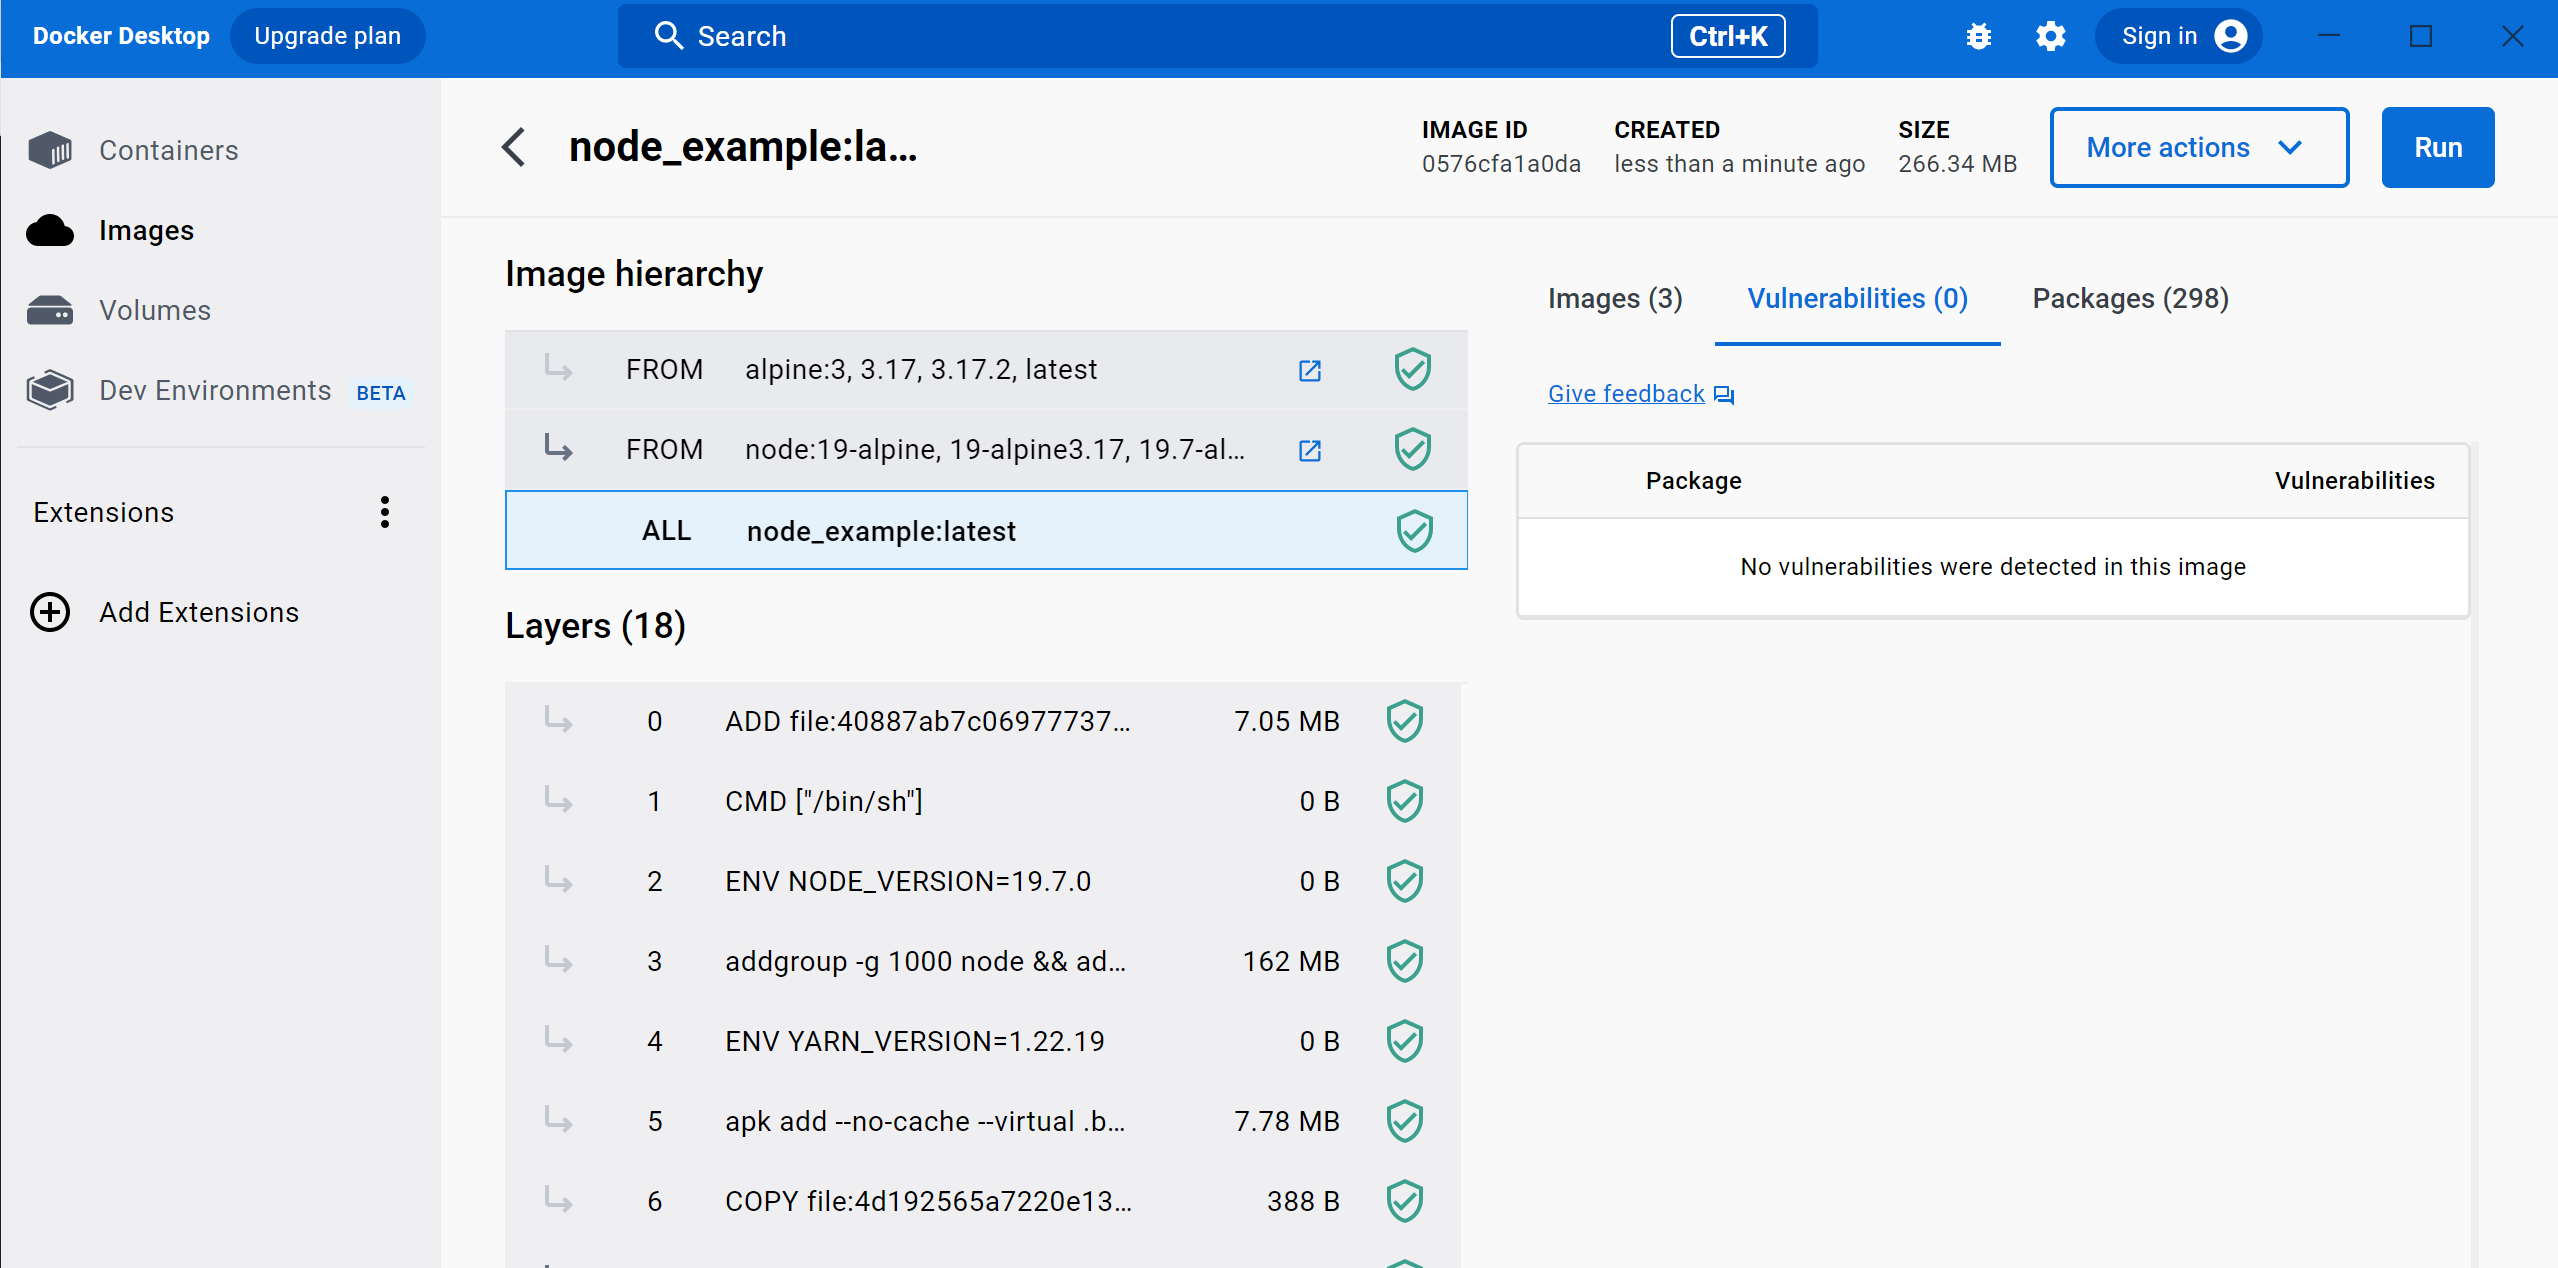
On the Docker Desktop in your local machine, navigate to your created image, and you should have a clear view of the image layers as follows:

Docker shows that this image has 18 layers. This includes layers used to package the base image. However, you are accountable for ten layers that you can control based on the Dockerfile used to build this image.
Layers are managed based on the command they execute. This means you can combine consecutive commands that perform the same function. The above example has multiple consecutive RUN commands. Each creates a layer of its own, creating 4 layers in this case. However, you can combine them into one as follows:
FROM node:19-alpine
WORKDIR /app
COPY package*.json ./
COPY . .
RUN npm install && \
    npm run build && \
    rm -rf node_modules && \
    npm install --production
EXPOSE 4000
CMD npm start
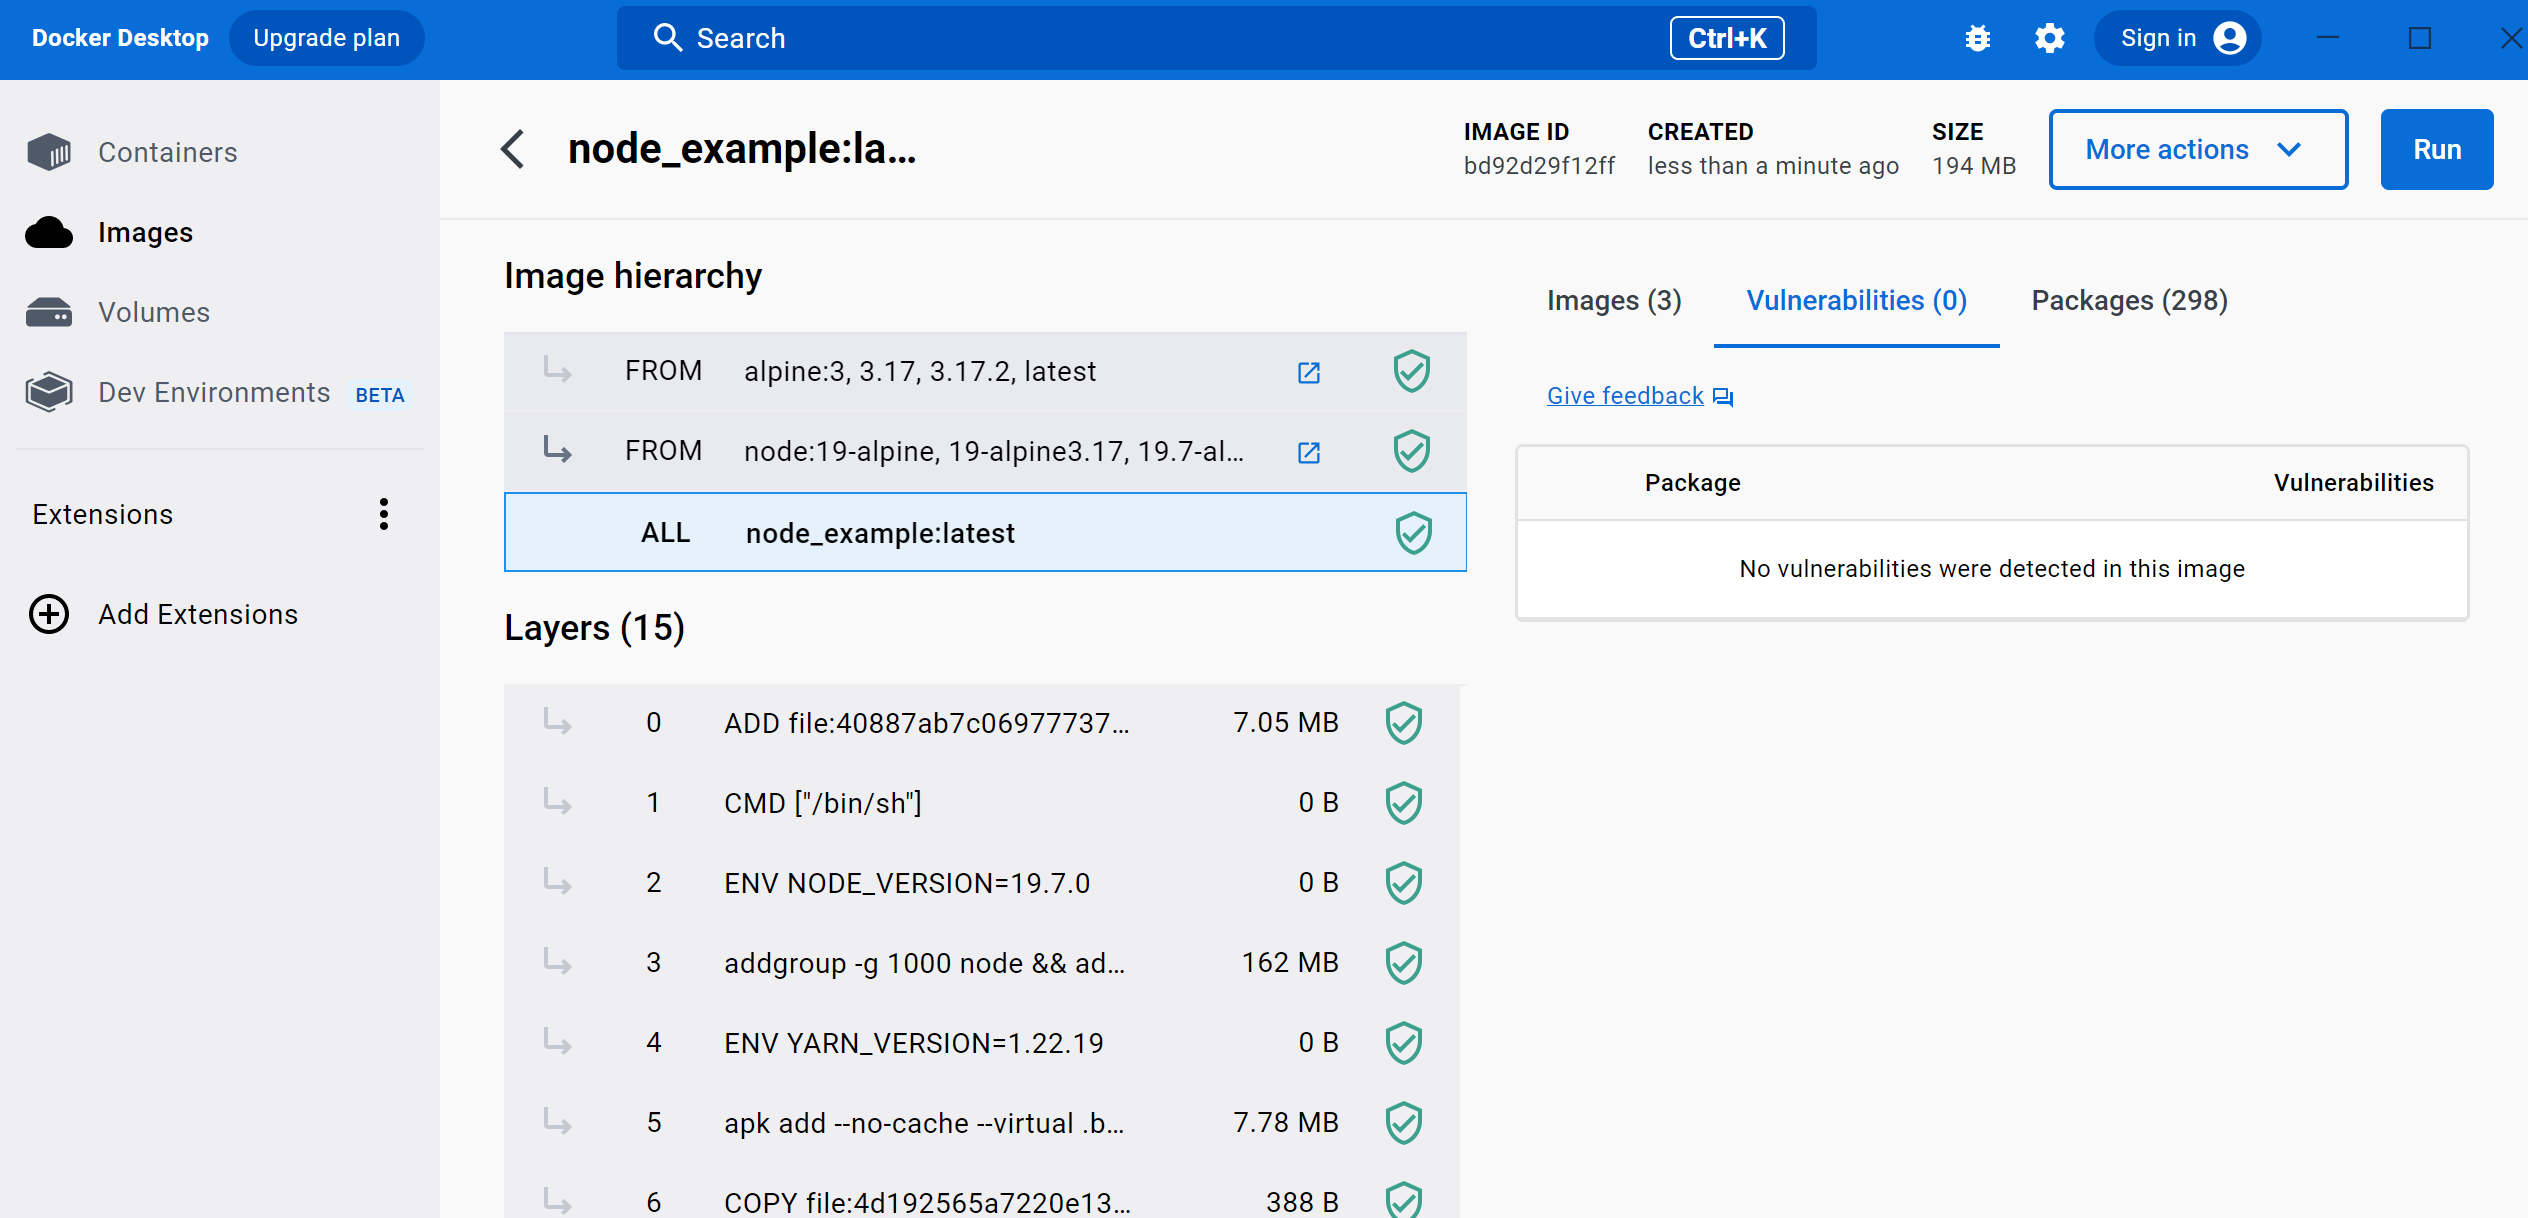
When you build an image based on this, the Image layers will be reduced to 15:

This drastically reduced the overall image size to 194MB from 266MB:
REPOSITORY     TAG       IMAGE ID       CREATED         SIZE
node_example   latest    bd92d29f12ff   2 minutes ago   194MB
Using Multistage Builds to Slim Docker Images
Dockerfiles form the foundation for building Docker images. They specify the necessary instructions for Docker to package your application. Traditionally, applications follow the builder pattern to bundle their assets, meaning that you need to build the application code to determine how it will be served in the production environment.
Using Docker while following the build pattern approach means you have to create two Dockerfiles to fully package your application. As a result, two images are eventually created, each taking its own disk space.
Take this Typescript application used in this guide as an example. Typescript must be compiled into Javascript before it can be executed. Therefore, you need two Dockerfiles for development and production purposes. One Dockerfile for packaging the application compiling stage, and another Dockerfile for running the compiled code on production. Also, In many cases, the dependencies required for a production environment are different from those required for a development environment. Therefore, separate Dockerfiles are often used to specify these dependencies.
However, using multiple Dockerfiles to run the same application is not ideal for optimizing your final build, as it results in large image sizes that take a lot of the disk size.
The concept of multistage builds allows you to create a single Dockerfile from different stages to create a final image. It defines multiple FROM statements. Each statement creates a new build stage and sets the base image for that stage. This way, Docker allows you to copy content from different stages to buddle the final image.
Using the production and development Dockerfiles examples, we can use the following multistage Dockerfile to build the same image:
#Stage One: Build
FROM node:19-alpine AS builder
WORKDIR /app
COPY . .
RUN npm install
RUN npm run build

#Stage Two: Final
FROM node:19-alpine AS final
WORKDIR /app
COPY --from=builder ./app/build ./build
COPY package*.json ./
RUN npm install --production
CMD npm start
In this case, the first stage created the application build. This build will be copied by the second stage to create the final image. The builder stage will create an image at the first stage. Using the COPY --from=builder, the final stage will copy the first stage’s results and use it for packaging the final image in production.
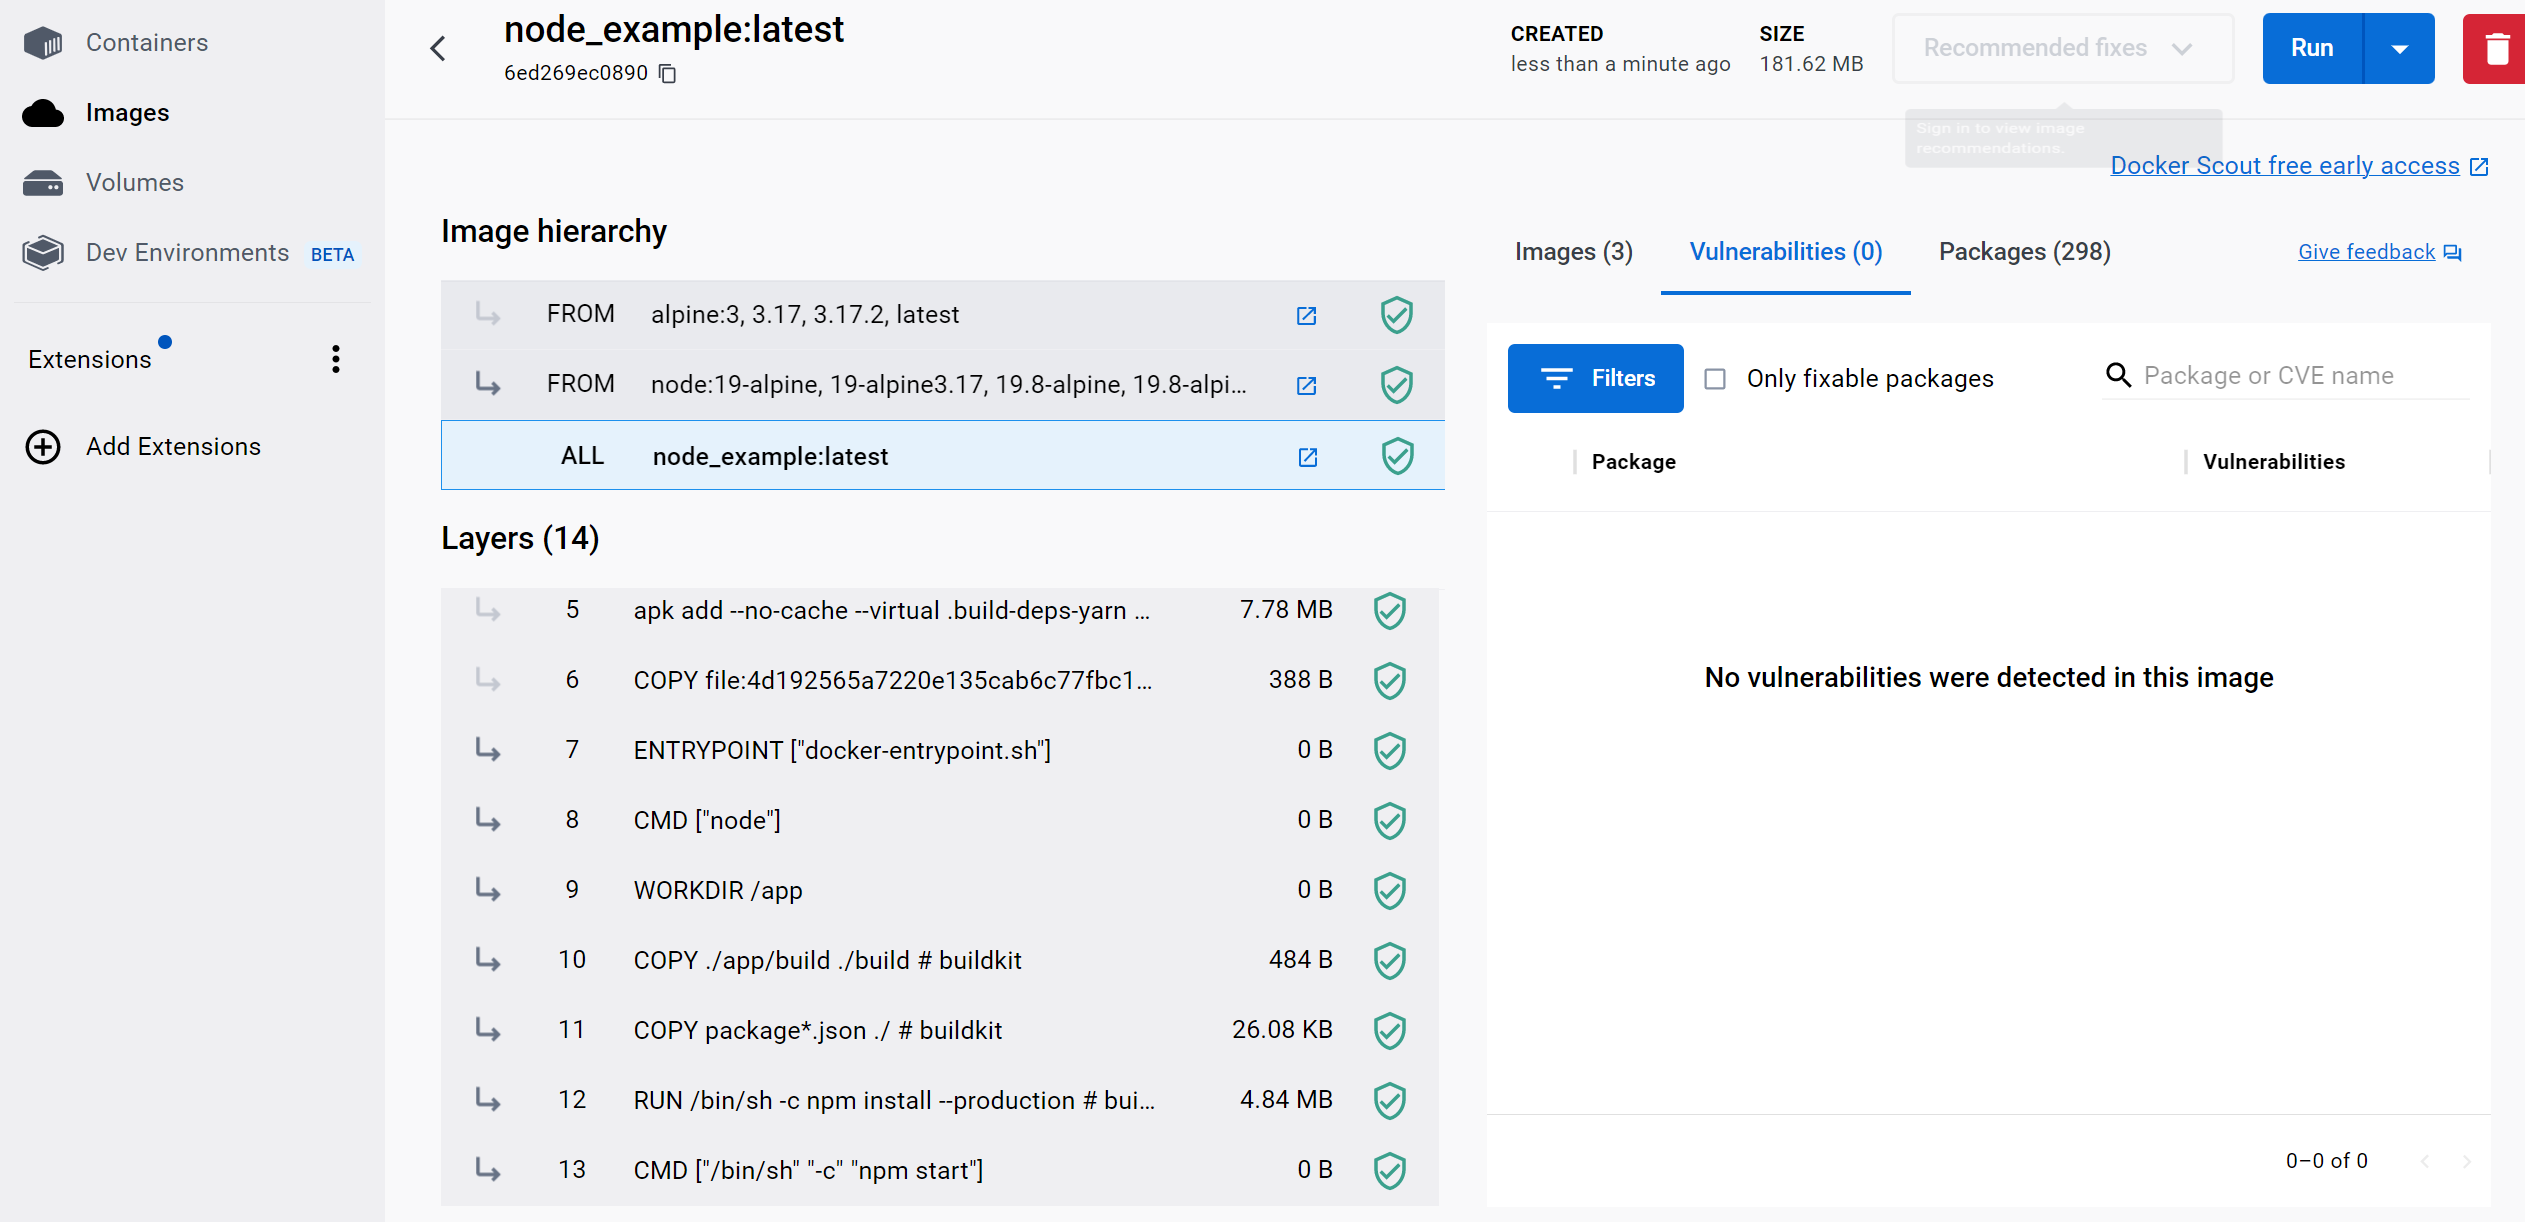
In this case, you have one Dockerfile that builds the application for you and create the final production-ready image under one image. As a result, you reduce the number of layers in your image:

And so the total size of your Docker image:
REPOSITORY     TAG       IMAGE ID       CREATED         SIZE
node_example   latest    b066d92ab741   2 minutes ago   181MB
Multistage builds are not limited to the same FROM statements with the same base image. It can be used to dockerize multiple applications at once to minimize overall resource utilization. This multistage build example uses two FROM statements using Node.js and Nginx base images to implement a multistage build concept.
It’s good to note that when using a multistage build, Docker doesn’t know the exact environment you are in. Docker follows the instructions defined in your Dockerfile to create the final image. However, you can build the image for development and production, specifying the target stage using a Docker --target flag to run the Docker build command. To create images for both the development and production stages, specify the builder stage as follows:
docker build --target builder -t node_example:dev .
docker build --target final -t node_example:prod .
Using Tools to Reduce Docker Image Size
A few tools can help you reduce the image size even further. They offer built-in image compression capabilities to create smaller images than the original. They include:
- DockerSlim remove unnecessary files and dependencies and create a new, slimmed image with only the essential components -Dive analyze your image layers metadata. It then identifies unused dependencies, duplicate files, and other inefficiencies you can remove to slim down your final image.
- Docker-squash squashes multiple image layers into a single layer.
To use Docker-squash for compressing Docker images, you can add the --squash flag to the docker build command. For example:
docker build . -t node_example --squashThis will compress the final image into one layer.
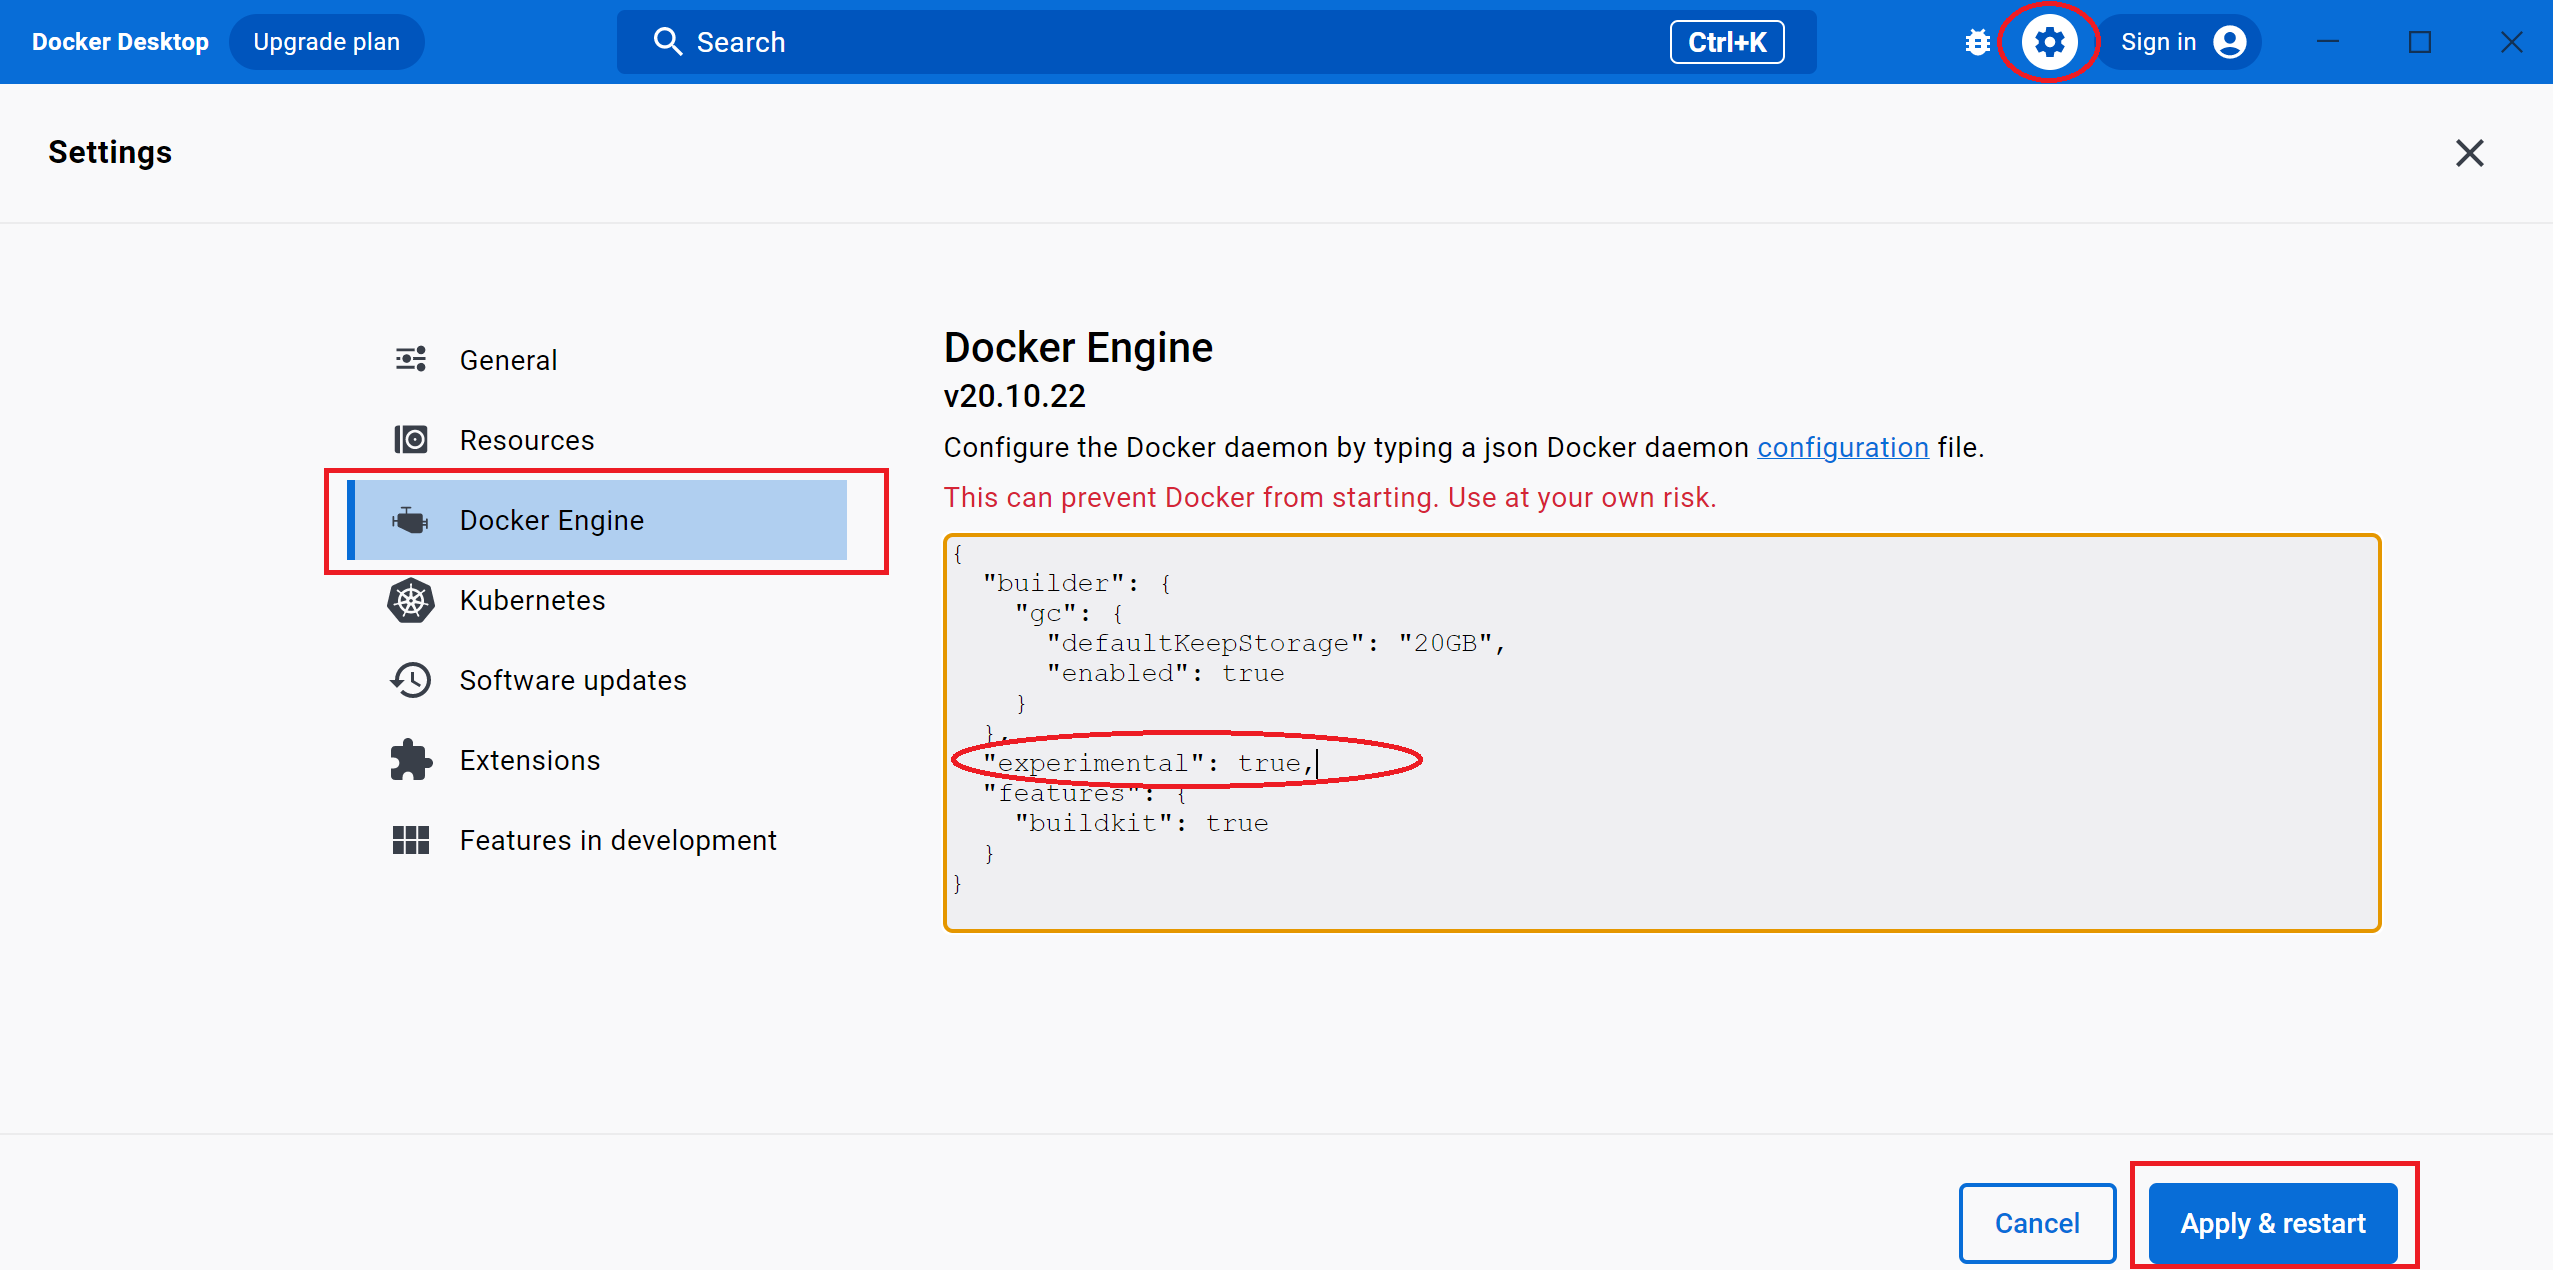
Ensure you have the experimental setting to true before running --squash.
This is because the --squash feature is an experimental feature in Docker. It is not fully supported and may cause compatibility issues with some docker registries or tools.
Navigate to your Docker settings on the Docker Desktop and enable experimental to true as follows:

The image is further reduced to 162MB:
REPOSITORY     TAG       IMAGE ID       CREATED         SIZE
node_example   latest    b066d92ab741   1 minutes ago   162MB
You can check out how to use DockerSlim to further reduce the current image size (162) to approximately 91.5%.
Conclusion
Docker ensures you package your applications for easier portability across different infrastructures such as Kubernetes clusters, Cloud platforms and CI/CD pipelines. This makes pushing changes to the existing application easier while sharing it with varying environments without affecting compatibility. Given that Docker image sizes can consume large disk sizes, in this guide, you learned the following Docker image optimization strategies:
- Using the
.dockerignorefile - Reducing Docker image layers
- How to choose Docker base images
- How to use multistage build to Docker reduce image size
- Tools to reduce Docker image size
Using these strategies, you managed to reduce the Docker image of 1.16GB to 162MB. You have learned the tools and tips that you need to use to reduce Docker image size to approximately 85.86%. I hope you found this post helpful.
Earthly makes CI/CD super simple
Fast, repeatable CI/CD with an instantly familiar syntax – like Dockerfile and Makefile had a baby.


