How to Manage Kubernetes Resources Using K9s
We’re Earthly. We simplify and speed up building software using containerization – perfect if you’re into managing Kubernetes resources. Give us a try.
Kubectl is the de facto and most popular Kubernetes command line tool used for accessing Kubernetes cluster metrics. However, one needs to know many commands to fetch metrics and operate a Kubernetes cluster using Kubectl. Though the CLI is robust, commands can quickly become cumbersome to run. For example, here is a command for editing a deployment:
kubectl edit deployment/mydeployment -o yaml --save-configNot the longest command, but typing things like this over an over can get cumbersome. Fortunately, there is a terminal UI called K9s that makes interacting with your cluster faster and easier. It abstracts many common kubectl commands and maps them to just a few shortcut keys or clicks of the mouse.
In this tutorial, you will learn how to install K9s and use it to fetch cluster metrics and help manage your cluster.
Installing K9s on Linux Distributions
Before you install K9s, make sure you install kubectl if you haven’t installed it already. This tutorial will use a minikube cluster as an example project, but k9s works just as well with any type of Kubernetes cluster.
You can install k9s using homebrew with the following command.
brew install derailed/k9s/k9sThis tutorial will focus on using k9s with Linux, but versions are available for other operating systems as well.
Confirm the installation was successful by checking the version.
k9s versionYou will get the following output if K9s has been installed successfully:
 ____  __.________
|    |/ _/   __   \______
|      < \____    /  ___/
|    |  \   /    /\___ \
|____|__ \ /____//____  >
        \/            \/

Version:    v0.25.18
Commit:     6085039f83cd5e8528c898cc1538f5b3287ce117
Date:       2021-12-28T16:53:21Z
To get started, use the k9s -h command to display all available commands. This will help you learn K9s faster and give you more clarity about certain commands. In addition, you can learn more about K9s from K9s documentation.
Available Commands:
  completion  generate the auto completion script for the specified shell
  help        Help about any command
  info        Print configuration info
  version     Print version/build info
Giving K9s Access to Minikube Cluster Metrics
Before we can start using k9s, let us enable the metric-server add-on which will give K9s access to minikube cluster metrics. Use the following command to allow K9s to collect metrics from your minikube cluster:
minikube addons enable metrics-serverYou will get the following output:
! Executing "docker container inspect minikube --format={{.State.Status}}" took
an unusually long time: 6.2066183s
* Restarting the docker service may improve performance.
* The 'metrics-server' addon is enabled
Using the K9s UI Terminal
Use the following command to launch K9s on your terminal:
k9sYou will get the following output that shows all clusters present in the Kubeconfig; K9s will automatically read from your Kubeconfig to get information related to your clusters. You can then press on the cluster you want to access:

If you click on the 0 digit on your computer, you will get all the namespaces in your cluster:

You can navigate through the UI terminal using the commands displayed on top of the UI table.

In addition, you can press the ? key on your keyboard to get all available short keys:

Editing Resources
With k9s, it’s easy to edit a specific manifest. By clicking on the letter E, K9s will give you the selected YAML file you want to edit in a text editor:
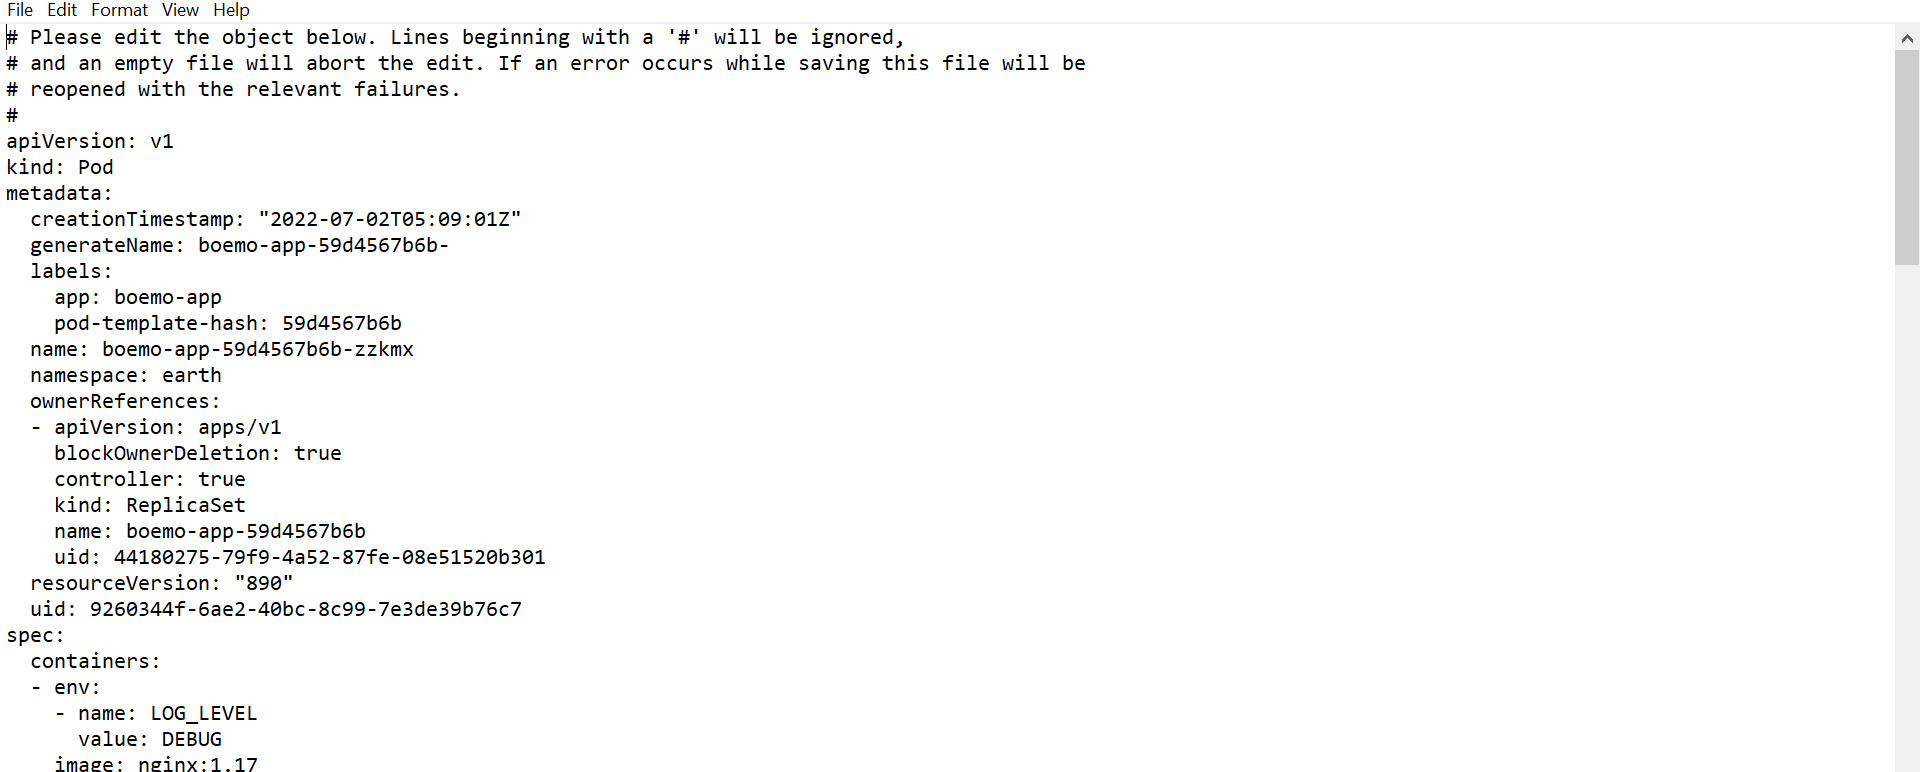
Change the specifications and save the file, and then close the text editor to get back to the K9s terminal.
How to Manage Your Cluster Using K9s
Setting up a logging management system to facilitate your logs can help you manage and track performance and resource issues in your cluster. A logging tool will provide facilities for sorting logs and most of all retrieving the logs later on. K9s will display your namespace’s logs. To get a specific namespace’s logs, click on the namespace and then click on the L key to display the logs.
K9s does not allow you to select text. If you want to copy the logs click on the C key.

To get a specific time range for displaying logs use the following numbers on your keyboard:
- 1: All logs over the last minute.
- 2: Over 5 minutes.
- 3: Over 15 minutes.
- 4: Over 30 minutes.
- 0: Over the entire lifetime of the pod.

Use the escape key to get back to the main terminal.
Getting Information About Your Cluster
K9s has a search bar which you can access by pressing the colon : and typing the resource you want to access. For example, if you press the colon and type “de” k9s will auto-complete to suggest the deploy resource. Press the tab button if you want to complete the suggestion and press enter to get access to the resource:

To get your location in K9s, look at the bottom of the K9s UI terminal and you will see your location. The last component on the right is where you are currently at:

The above picture shows that I am currently accessing the logs. If I press the escape button the container text will be highlighted as yellow to show that I am now accessing containers.
In case you want to go back, press on the escape key. You can also get other navigation features and tasks at the top of every section on K9s UI.
Whenever you need help press on the ? key to get all keys that can be applied to the resources you selected.
Here are the basic navigation keys you will surely need:
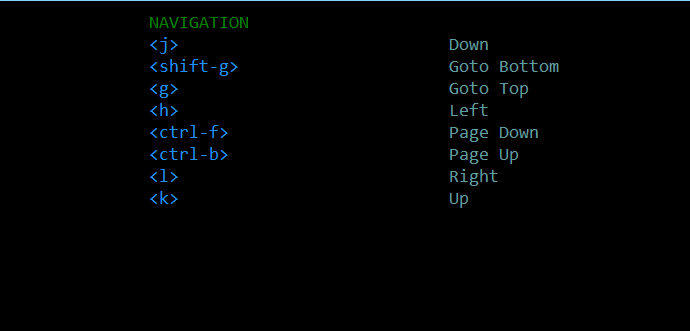
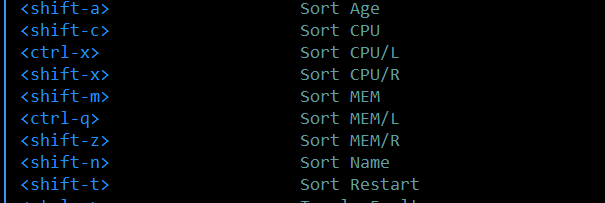
Sorting objects and resources boosts your search capability. Use the following keys to sort components and find whatever you are looking for quickly:
Describing Resources
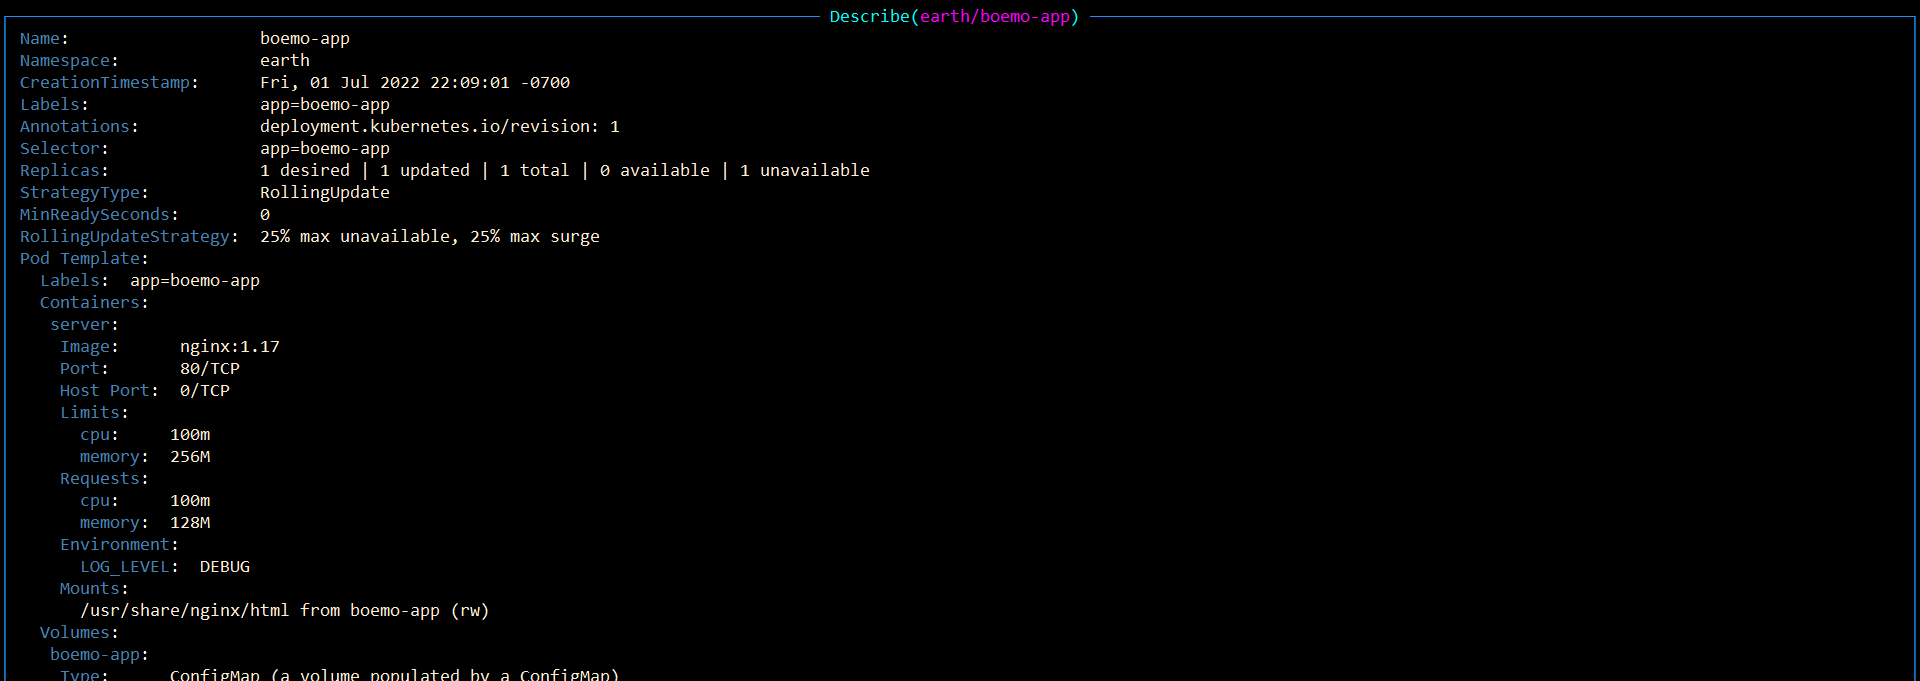
With K9s you don’t have to type in long commands to describe a namespace or any other Kubernetes resource; just press the letter d and you will get the description:
Getting an Overview of Resource Metrics
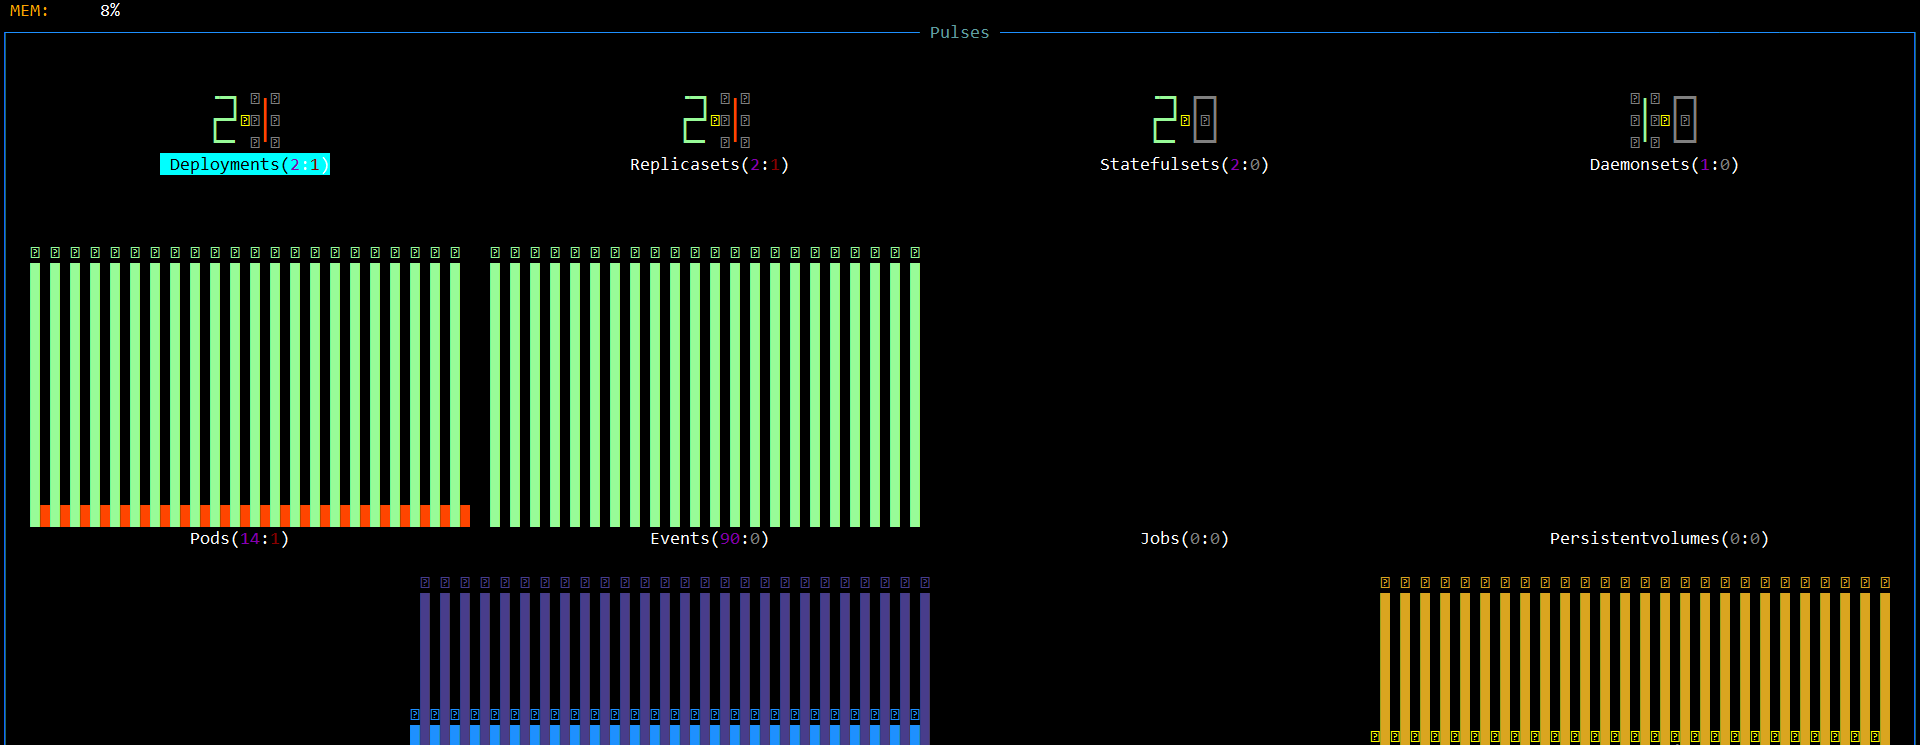
K9s makes cluster management easy because it enables you to get the number of created Statefulsets, DaemonSets, Deployments, and other resources using a command called :pulses. This command enhances accessibility because you can view the resources in one pane and most of all you can select the object to describe or edit it.
Before we try to use the :pulses command let’s create two objects: a StatefulSet, deployment and a service so that we can get an output when using the :pulses command. Create a YAML file called new-statefulset.yaml and add the following content:
apiVersion: v1
kind: Service
metadata:
  name: nginx
  labels:
    app: nginx
spec:
  ports:
  - port: 80
    name: name
  clusterIP: None
  selector:
    app: nginx
---
apiVersion: apps/v1
kind: StatefulSet
metadata:
  name: earth
spec:
  selector:
    matchLabels:
      app: nginx
  serviceName: "nginx"
  replicas: 3
  template:
    metadata:
      labels:
        app: nginx
    spec:
      terminationGracePeriodSeconds: 10
      containers:
      - name: nginx
        image: k8s.gcr.io/nginx-slim:0.8
        ports:
        - containerPort: 80
          name: earth
Use the following command to apply the above objects to the cluster:
kubectl apply -f new-statefulset.yamlNext, create a file called deployment.yaml and add the following contents:
apiVersion: apps/v1
kind: Deployment
metadata:
  name: boemo-app
  namespace: earth
  labels:
    app: boemo-app
spec:
  replicas: 1
  selector:
    matchLabels:
      app: boemo-app
  template:
    metadata:
      labels:
        app: boemo-app
    spec:
      containers:
      - name: server
        image: nginx:1.17
        volumeMounts:
          - name: boemo-app
            mountPath: /usr/share/nginx/html
        ports:
        - containerPort: 80
          protocol: TCP
        resources:
          requests:
            cpu: 100m
            memory: "128M"
          limits:
            cpu: 100m
            memory: "256M"
        env:
        - name: LOG_LEVEL
          value: "DEBUG"
      volumes:
      - name: boemo-app
        configMap:
          name: boemo-app
          items:
          - key: body
            path: index.html
Apply the above object to your cluster. To get the number of resources and objects available type :pulses on the K9s terminal and you will get the following output:
Draining Nodes and Killing Pods
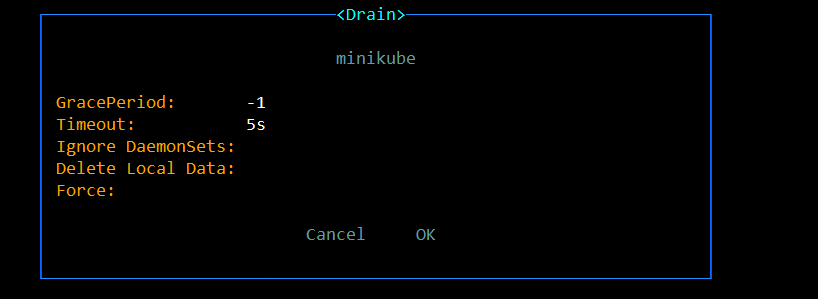
If you want to drain your node, start by searching for the node and then select it. Press r to drain the node. You will get the following dialogue which will request information on the grace period and timeout.
Press ctrl + d to delete a resource or ctrl+k if you want to kill a pod:

Conclusion
In this tutorial, we covered the basics of installing K9s on Linux and managing your cluster with it. Kubernetes is getting friendlier for newbies, thanks to out-of-tree plugins and tools like K9s. If you’re just starting on Kubernetes and find Kubectl a bit tough, give K9s a shot - it’s definitely a game-changer!
Speaking of game-changers, if you’re loving K9s for Kubernetes management, you might also like Earthly for simplifying your build automation. It’s another tool that can make your development process smoother and more efficient. Check it out!
Earthly makes CI/CD super simple
Fast, repeatable CI/CD with an instantly familiar syntax – like Dockerfile and Makefile had a baby.


