How to Build Java Projects with Bazel
We’re Earthly. We make building software simpler and therefore faster using containerization. This article is about building Java projects with Bazel. If you want to see what can be done by combining ideas from a Makefile and a Dockerfile then check us out.
If you’re a Java developer, you’ll have likely used ANT, Maven, or Gradle to build your projects. Many of these solutions have been around for decades, but Java’s changed a lot over the years. While these tools are still serviceable, you may want something more conducive to the current speed of application development and deployment.
Bazel is an open-source automatic build tool that has more to offer in the way of extensibility, scalability, and flexibility. It was developed by Google, but it’s suitable for organizations of any size that want to accelerate builds and reduce build configuration time. Because Bazel uses cached artifacts and rebuilds only what’s changed in the code, it can build complex code bases quickly.
While Bazel supports a large host of programming languages and platforms, let’s focus on how to use it specifically with Java. This tutorial walks you through a simple project showcasing Bazel’s key capabilities.
Prerequisites
I’m assuming a couple of things before you move on:
- You have the latest JDK installed on your system.
- You have the
JAVA_HOMEenvironment variable set.
You can find the project files for this tutorial on GitHub. Note that this tutorial uses the Windows 10 OS, but Bazel runs on macOS and Linux as well.
Installing Bazel
Currently, the best way to install Bazel is using Bazelisk. This requires you to install and configure Chocolatey. Once that’s done, open a terminal window or emulator (Command Prompt, PowerShell, etc.) with administrator permissions.
Run the following command:
choco install bazeliskWhen asked if you want to install the script, enter A for ALL.
Create Your Java Project File
Create a folder called BazelExample to house your project, then create a simple Java class. Note that your class must use an external dependency. As an example, the following sample code uses the TextIO library to create a simple console application that prompts users to input their usernames and passwords:
package com.bazel.example;
import org.beryx.textio.TextIO;
import org.beryx.textio.TextIoFactory;


public class Salutations {

    public static void main() {
        TextIO textIO = TextIoFactory.getTextIO();

        String user = textIO.newStringInputReader()
            .withDefaultValue("admin")
            .read("Username");

        String password = textIO.newStringInputReader()
            .withMinLength(6)
            .withInputMasking(true)
            .read("Password");

    }
}
I recommend that you use the Maven standard directory layout, like so:
BazelExample
├── src
│   └── main
│       └── java
│           └── com
│               └── bazel
│                  └─ example
│                     └── Salutations.java
Configure Your Workspace
To use Bazel, you must assign a workspace to contain your source files, resources, and output builds. Navigate to the root of your project folder (eg, BazelExample) and create an extension-less file called WORKSPACE.
The next step is to create a build file for the project.
Create a Build File
Build files tell Bazel where to find your source files and how to build them. Again, you need to create an extension-less file at the root of your project’s directory. This time, call it BUILD. Its contents should be as follows (or similar):
load("@rules_java//java:defs.bzl", "java_binary")

java_binary(
    name = "Salutations",
    srcs = ["src/main/java/com/bazel/example/Salutations.java"],
    main_class = "com.bazel.example.Salutations",
)
In addition to identifying sources, BUILD contains a set of instructions and configurations known as rules. The first thing the BUILD file tells Bazel to do is load the java_binary rule from the rules_java extension (load("@rules_java//java:defs.bzl", "java_binary")). It tells Bazel to package the compiled files into a .jar file and creates a wrapper shell script called a target.
The java_rule contains a set of arguments for configuring the final binary (.jar) file. name dictates what the final binary is named, srcs specifies the source files to compile and build, and main _class indicates which class should run the program.
You should only have one source file at this moment, but it’s possible to specify multiple files. Use the glob function to add wildcards and include or exclude multiple files without listing them manually:
srcs = glob(["src/main/java/com/bazel/example/*.java"]),You now have all the essentials required to build this tutorial’s project. However, the sample code has external dependencies, so keep in mind the build and application won’t work without them.
Adding Dependencies and Splitting Your Project

So you’ve established the foundation of your workspace and build. Now you need to add TextIO as an external dependency, or you’ll run into a compilation error.
Adding an External Dependency
To add a mechanism to fetch external dependencies and add them to your build, open the WORKSPACE file you created earlier in a source code editor of your choice. Add the following contents to it:
load("@bazel_tools//tools/build_defs/repo:http.bzl", "http_archive")

#USE Latest version of RULES_JVM_EXTERNAL
RULES_JVM_EXTERNAL_TAG = "5.1"
RULES_JVM_EXTERNAL_SHA ="8c3b207722e5f97f1c83311582a6c11df99226e65e2471086e296561e57cc954"

#Fetches Extension
http_archive(
    name = "rules_jvm_external",
    strip_prefix = "rules_jvm_external-%s" % RULES_JVM_EXTERNAL_TAG,
    sha256 = RULES_JVM_EXTERNAL_SHA,
    url = "https://github.com/bazelbuild/rules_jvm_external/releases/download/%s/rules_jvm_external-%s.tar.gz" % (RULES_JVM_EXTERNAL_TAG, RULES_JVM_EXTERNAL_TAG)
)

#rules_jvm_external depends on this library.
http_archive(
    name = "bazel_skylib",
    sha256 = "b8a1527901774180afc798aeb28c4634bdccf19c4d98e7bdd1ce79d1fe9aaad7",
    urls = [
        "https://mirror.bazel.build/github.com/bazelbuild/bazel-skylib/releases/download/1.4.1/bazel-skylib-1.4.1.tar.gz",
        "https://github.com/bazelbuild/bazel-skylib/releases/download/1.4.1/bazel-skylib-1.4.1.tar.gz",
    ],
)
The first thing the code does is load an HTTP Repository Rule (http_archive). Again, Bazel needs some way to fetch the necessary dependency files, hence the addition of the rules_jvm_external extension. It enables Bazel to retrieve the right libraries from the right sources.
I recommend that you use the latest version of the extension. At the time of writing, that’s version 5.1.
You may notice that the code fetches the bazel_skylib library, too. The latest versions of the rule_jvm_external extension depend on it, so the build would fail without its inclusion.
Now that you’ve added the rules_jvm_external extension, you have to tell it what to do. Add the following code to your WORKSPACE file:
load("@rules_jvm_external//:defs.bzl", "maven_install")

maven_install(
    artifacts = [
        "org.beryx:text-io:3.4.1",

    ],

    repositories = [
        "https://maven.google.com",
        "https://repo1.maven.org/maven2",
        "https://jcenter.bintray.com/",
        "http://uk.maven.org/maven2",
    ],
)
This uses the maven_install rule from the rules_jvm_external extension to specify which dependencies to fetch and which repositories to look in. The first argument, artifacts, accepts a list of artifact names. The second, repositories, contains a list of repositories. The more repos you add, the more likely it is that Bazel will find the dependency.
Once you’re finished editing the WORKSPACE file, save and close it.
Now it’s time to edit the BUILD file. Edit the java_binary rule’s argument list:
java_binary (
    name = "Salutations",
    main_class = "com.bazel.example.Salutations",
    srcs = ["src/main/java/com/bazel/example/Salutations.java"],
    deps = ["@maven//:org_beryx_text_io"],
)
This adds the org.beryx.text-io dependency to your project. The deps rule uses the Canonical path to point toward the dependencies. Any slashes and dashes in the package name are replaced with underscores (_).
That’s how you add external dependencies, but what about local dependencies? The best way to add a local dependency is to split your project and create separate targets for your local libraries or class files.
Splitting Your Project and Adding Local Dependencies
Create a new folder in the src/main/java/com/bazel/example/ folder called greetings. Next, create a new Java file called Greeter.java and add the following:
package com.bazel.example.greetings;

public class Greeter {
    public static void sayHello() {
        System.out.println("Hello");
    }

}
Import the Greeter class and add a call to the sayHello() method from the main method of Salutations.java. The code should now look similar to this:
package com.bazel.example;

import com.bazel.example.greetings.Greeter;
import org.beryx.textio.TextIO;
import org.beryx.textio.TextIoFactory;


public class Salutations {

    public static void main(String [] args) {
        Greeter.sayHello();
        TextIO textIO = TextIoFactory.getTextIO();

        String user = textIO.newStringInputReader()
        .withDefaultValue("admin")
        .read("Username");

        String password = textIO.newStringInputReader()
        .withMinLength(6)
        .withInputMasking(true)
        .read("Password");

    }
}
To add it to the BUILD file, first add the java_library to the load function’s list of arguments:
load("@rules_java//java:defs.bzl", "java_binary", "java_library")Add the target:
java_library(
    name = "Greeter",
    srcs = ["src/main/java/com/bazel/example/greetings/Greeter.java"],
)
And finally, add the new target as a dependency:
java_binary (
    name = "Salutations",
    main_class = "com.bazel.example.Salutations",
    srcs = ["src/main/java/com/bazel/example/Salutations.java"],
    deps = ["@maven//:org_beryx_text_io",":Greeter"],
)
Your BUILD file should now look like this:
load("@rules_java//java:defs.bzl", "java_binary", "java_library")

java_library(
    name = "Greeter",
    srcs = ["src/main/java/com/bazel/example/greetings/Greeter.java"],
)

java_binary (
    name = "Salutations",
    main_class = "com.bazel.example.Salutations",
    srcs = ["src/main/java/com/bazel/example/Salutations.java"],
    deps = ["@maven//:org_beryx_text_io",":Greeter"],
)
Build Your Project
Now let’s go back to the terminal and build our project. Navigate to the root folder of your project’s directory structure and run the following command:
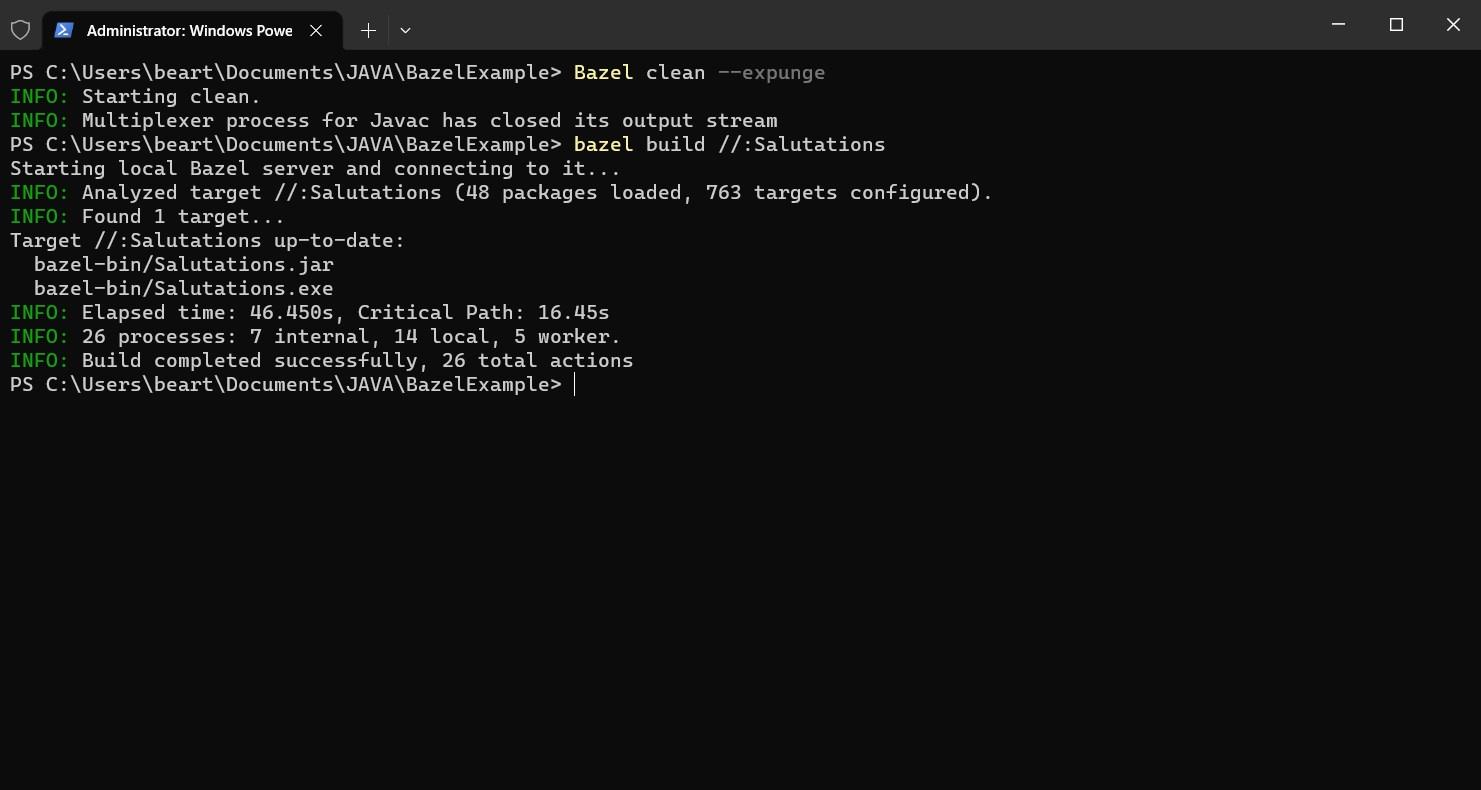
bazel build //:SalutationsThis builds your project and combines all the targets into a single package. The initial build may take a while, as Bazel has to download the necessary files in addition to compiling your class files. However long it takes, the final output should look similar to this:

Use your file explorer to navigate to the project folder, and you’ll find a collection of new folders and shortcuts. You can run the application by using:
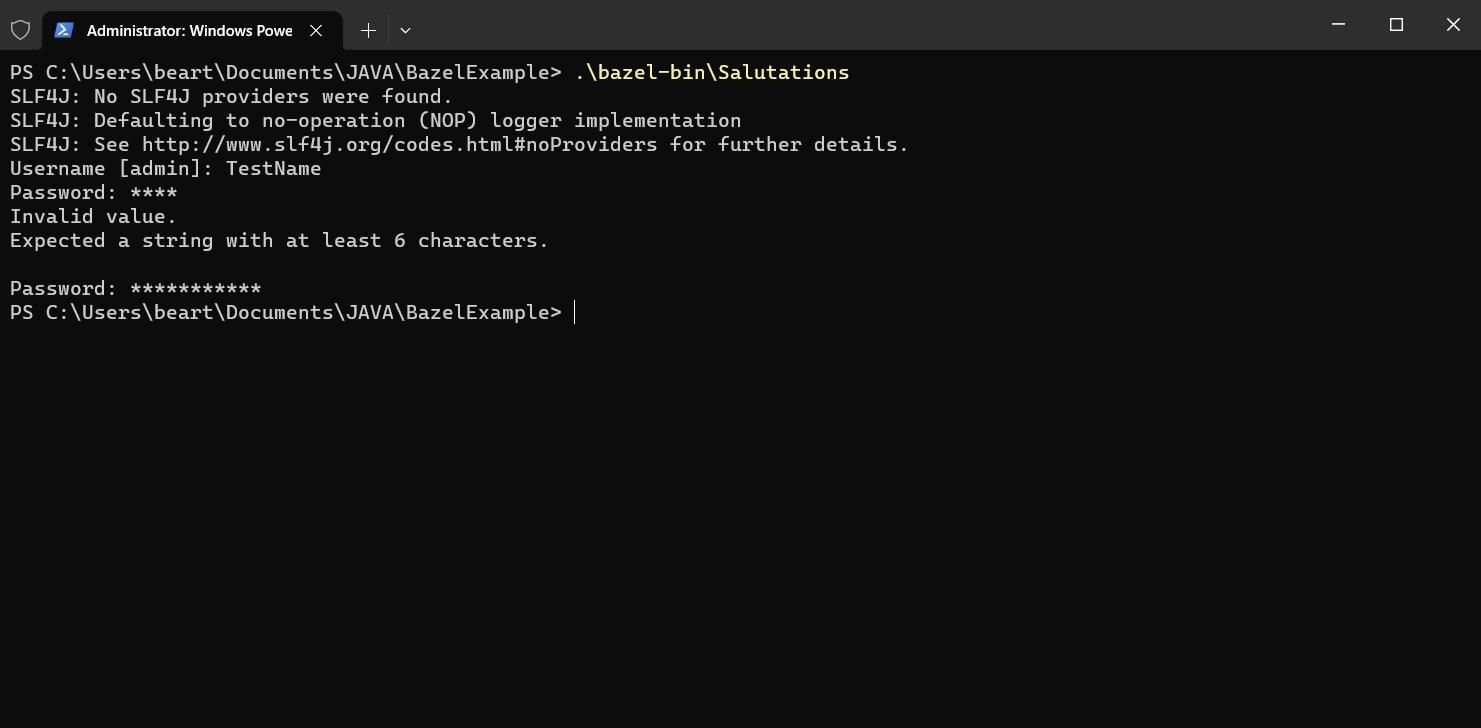
bazel-bin/Salutations ⚠You may encounter a warning message in regard to a missing SLF4J logger. You can ignore this.
To test your Java application, follow the prompts to enter a username and password.

Generating a Dependency Graph with Bazel
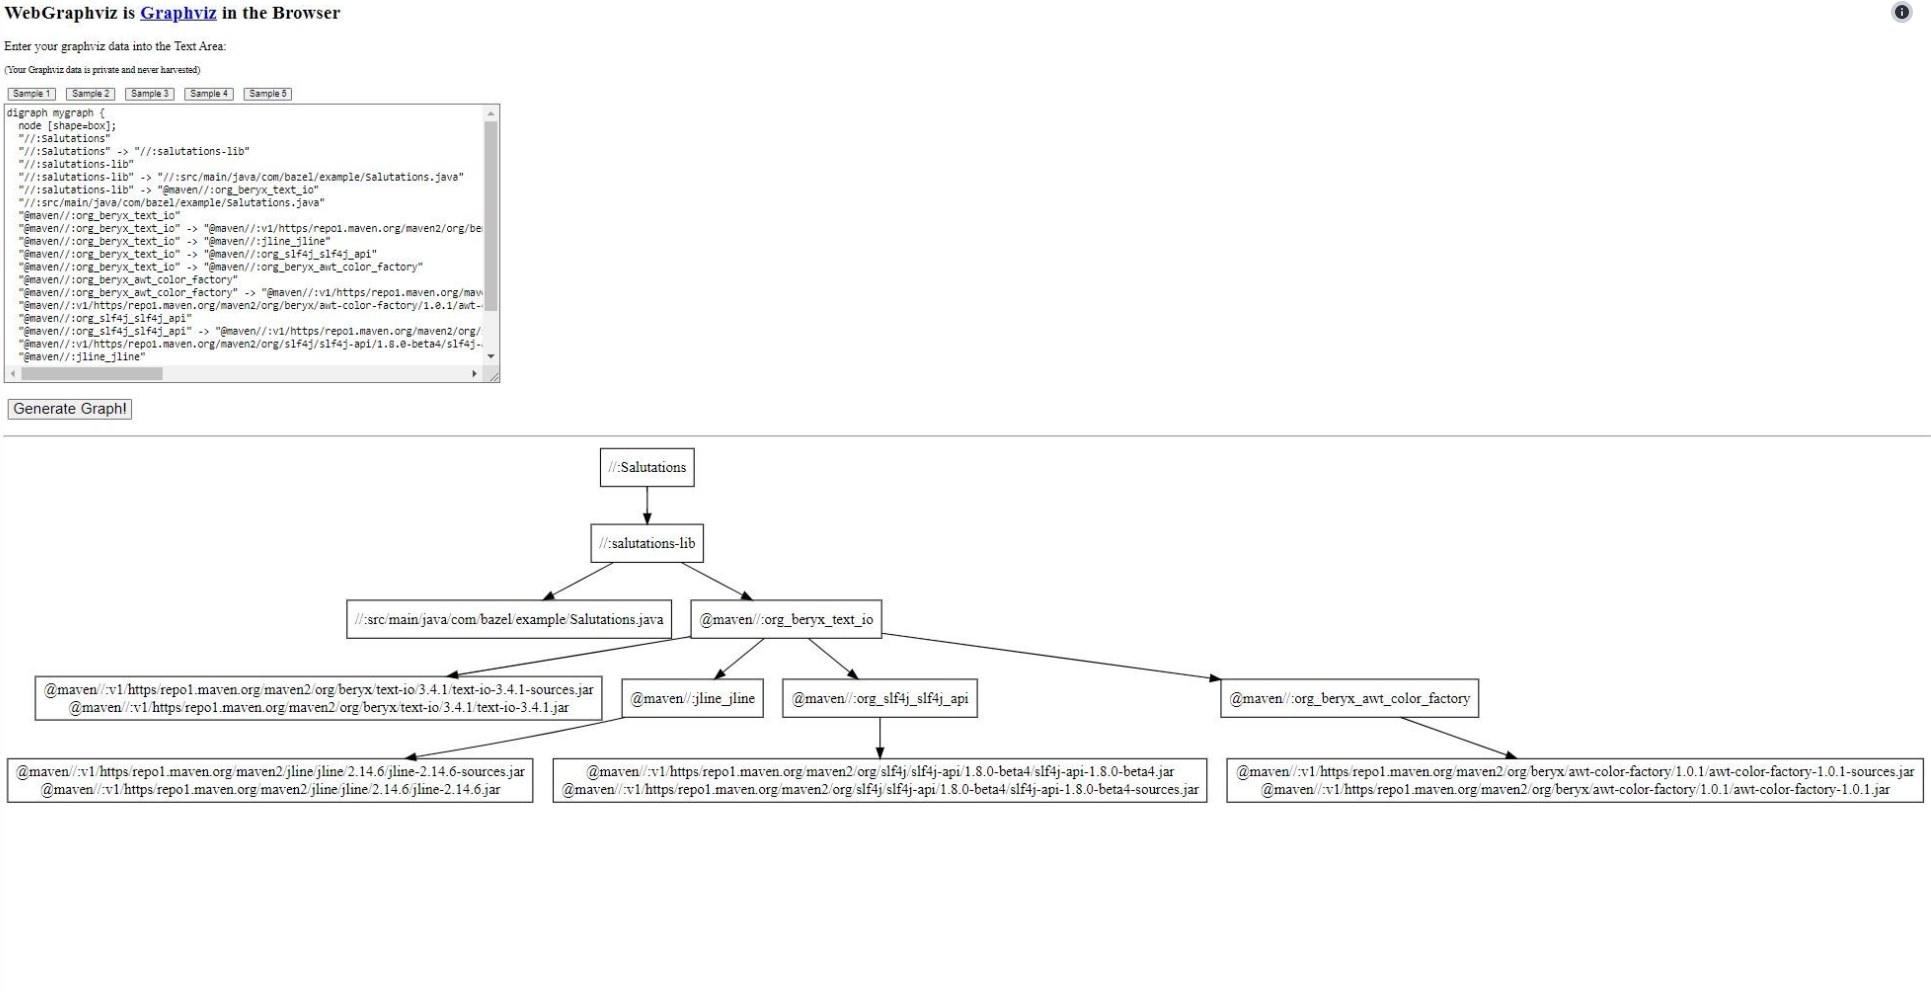
It can be a bit difficult to keep track of all the dependencies your project relies on. Sure, you can generate a directory structure and use that as a guide. However, Bazel allows you to generate dependency graphs to help you visualize the connections between your projects.
You can build these graphs using the Bazel query command:
bazel query "deps(//:Salutations)" --output graphThat should return a long wall of text. Copy the output and paste it into Graphviz. You’ll notice that the graph is extremely noisy. That’s because the data features all dependencies, including tooling and transitive and implicit dependencies that Bazel downloads and adds to your project.
You can simplify the graph by querying only the dependencies that are relevant to you and the core of your project:
bazel query  --notool_deps --noimplicit_deps "deps(//:Salutations)" \
--output graph
The above query ignores tooling and implicit dependencies, so the output should now be far more manageable:
digraph mygraph {
  node [shape=box];
  "//:Salutations"
  "//:Salutations" -> "//:salutations-lib"
  "//:salutations-lib"
  "//:salutations-lib" -> "//:src/main/java/com/bazel/example/Salutations.java"
  "//:salutations-lib" -> "@maven//:org_beryx_text_io"
  "//:src/main/java/com/bazel/example/Salutations.java"
  "@maven//:org_beryx_text_io"
  "@maven//:org_beryx_text_io" -> "@maven//:v1/https/repo1.maven.org/maven2/org/beryx/text-io/3.4.1/text-io-3.4.1-sources.jar\n@maven//:v1/https/repo1.maven.org/maven2/org/beryx/text-io/3.4.1/text-io-3.4.1.jar"
  "@maven//:org_beryx_text_io" -> "@maven//:jline_jline"
  "@maven//:org_beryx_text_io" -> "@maven//:org_slf4j_slf4j_api"
  "@maven//:org_beryx_text_io" -> "@maven//:org_beryx_awt_color_factory"
  "@maven//:org_beryx_awt_color_factory"
  "@maven//:org_beryx_awt_color_factory" -> "@maven//:v1/https/repo1.maven.org/maven2/org/beryx/awt-color-factory/1.0.1/awt-color-factory-1.0.1-sources.jar\n@maven//:v1/https/repo1.maven.org/maven2/org/beryx/awt-color-factory/1.0.1/awt-color-factory-1.0.1.jar"
  "@maven//:v1/https/repo1.maven.org/maven2/org/beryx/awt-color-factory/1.0.1/awt-color-factory-1.0.1-sources.jar\n@maven//:v1/https/repo1.maven.org/maven2/org/beryx/awt-color-factory/1.0.1/awt-color-factory-1.0.1.jar"
  "@maven//:org_slf4j_slf4j_api"
  "@maven//:org_slf4j_slf4j_api" -> "@maven//:v1/https/repo1.maven.org/maven2/org/slf4j/slf4j-api/1.8.0-beta4/slf4j-api-1.8.0-beta4.jar\n@maven//:v1/https/repo1.maven.org/maven2/org/slf4j/slf4j-api/1.8.0-beta4/slf4j-api-1.8.0-beta4-sources.jar"
  "@maven//:v1/https/repo1.maven.org/maven2/org/slf4j/slf4j-api/1.8.0-beta4/slf4j-api-1.8.0-beta4.jar\n@maven//:v1/https/repo1.maven.org/maven2/org/slf4j/slf4j-api/1.8.0-beta4/slf4j-api-1.8.0-beta4-sources.jar"
  "@maven//:jline_jline"
  "@maven//:jline_jline" -> "@maven//:v1/https/repo1.maven.org/maven2/jline/jline/2.14.6/jline-2.14.6-sources.jar\n@maven//:v1/https/repo1.maven.org/maven2/jline/jline/2.14.6/jline-2.14.6.jar"
  "@maven//:v1/https/repo1.maven.org/maven2/jline/jline/2.14.6/jline-2.14.6-sources.jar\n@maven//:v1/https/repo1.maven.org/maven2/jline/jline/2.14.6/jline-2.14.6.jar"
  "@maven//:v1/https/repo1.maven.org/maven2/org/beryx/text-io/3.4.1/text-io-3.4.1-sources.jar\n@maven//:v1/https/repo1.maven.org/maven2/org/beryx/text-io/3.4.1/text-io-3.4.1.jar"
}
Copy and paste the output once again into the Graphviz generator, and the hierarchy should look something like this:

Package the Binary for Deployment
At this point, you can’t really run salutations.jar, at least not on its own. That’s because it doesn’t contain the dependencies. You can check that by running the following command from your projects root:
jar -tf bazel-bin/Salutations.jarIt should reveal the following metadata:
META-INF/
META-INF/MANIFEST.MF
com/
com/bazel/
com/bazel/example/
com/bazel/example/Salutations.class
So you need to build a special deployment .jar:
bazel build //:Salutations_deploy.jarThere’s now a new file in your bazel-bin folder called Salutations_deploy.jar. Look at what’s inside the .jar by running the following command:
jar -tf bazel-bin/Salutations_deploy.jarThis should return a list of all the classes packed into the .jar. The list is too long to share here, but you can either run this .jar on its own or you can use the executable, depending on the project’s needs.
Conclusion
We’ve walked through the basics of building Java projects with Bazel in this tutorial. Now you should have a rough idea of how Bazel can improve your workflows and big project builds. If you enjoyed learning about Bazel, then you’ll love exploring Earthly - another nifty build automation tool for your tech stack. Check it out!
Happy coding!
Earthly makes CI/CD super simple
Fast, repeatable CI/CD with an instantly familiar syntax – like Dockerfile and Makefile had a baby.


